Skip to content

Filming guide: How to film a time study the AI can read

Fix a 1080p camera 4 to 6 m from the work, at a front-quarter angle, with the light behind it. Make every operator easy to tell apart, then upload each take as one file.

This guide is for the AI time and motion study on /time-and-motion-study. It covers video files you record and upload. Updated 2026-10-14.

The short version

Six rules for footage the AI can read

Each rule has its own section below, with the arithmetic and where it came from.

  1. Fix the camera

    Use a tripod or a mount, not a hand. A moving camera makes accuracy harder, so film from one spot.

  2. Get close enough

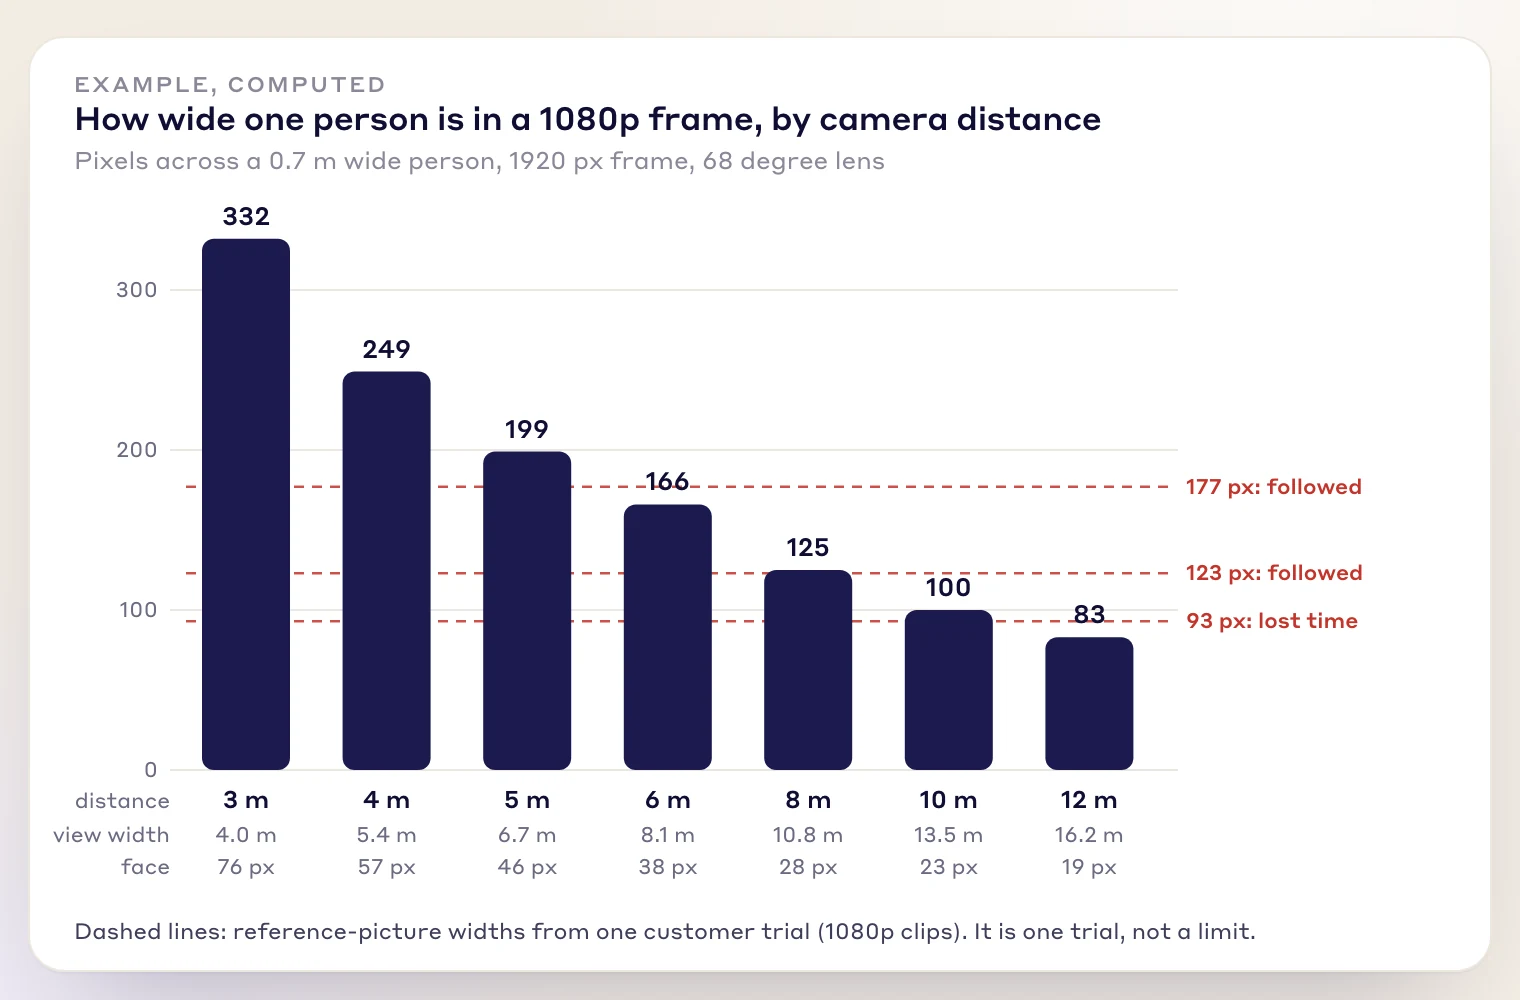
    At 1080p with a phone's main lens, 4 to 6 m puts each person at 166 to 249 pixels across. At 8 m each is about 125 pixels, at 12 m about 83.

  3. Show faces and markers

    Film from the front-quarter, about 45 degrees to the line of work, with light behind the camera and vest numbers or cap colours toward the lens.

  4. Shoot 1080p

    Standard 1080p footage is what the time study page asks for. Higher resolution multiplies the file size and heats the camera.

  5. One take, one file

    Record each cycle or process step as one continuous take and upload each take as one file. Do not cut clips together first.

  6. Name the process first

    Write the process name and its steps in your plant's words before you upload, so the AI labels what it sees in terms your team uses.

Why it matters

Same software, two very different studies

Why does one video give a clean study and the next one a pile of corrections? The people work the same way. What changes is what the camera can see.

Footage that struggles

  • A wide bay, shot from far away

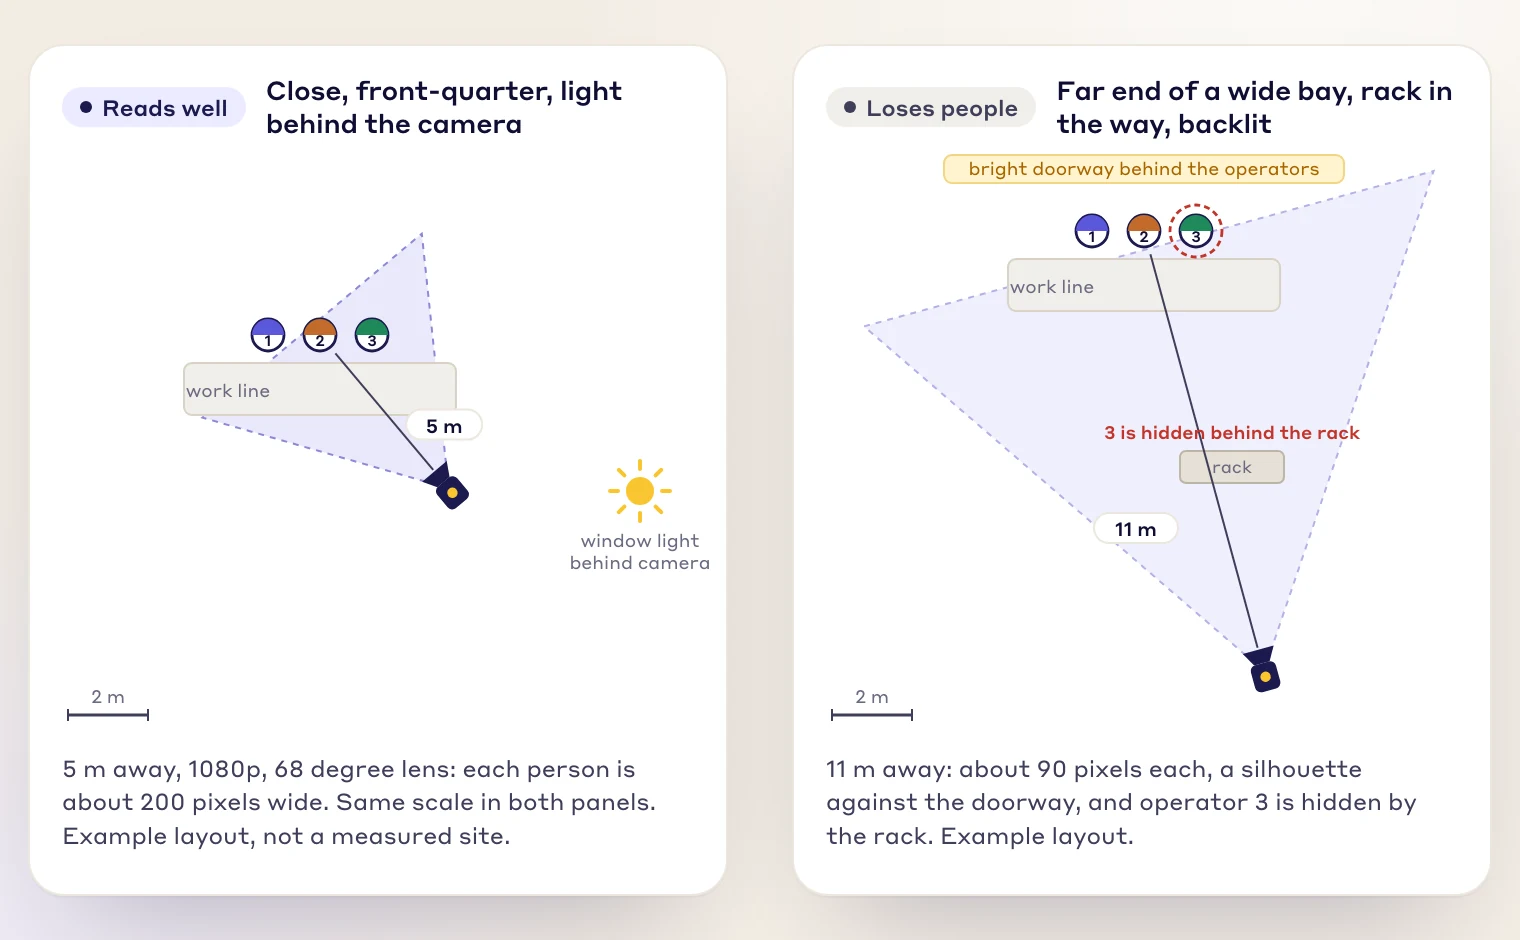
    People look small and are often passing behind equipment. In one two-hour trial of five people, about a third of the time could not be followed.

  • A bright doorway behind the operators

    One person came out as a dark silhouette with washed-out clothing colours. Her reference picture was 93 pixels wide, the narrowest of three, and hers was the track that lost time.

  • The same vest on everyone

    Before the operators were merged, the system had split those five people into 34 lanes. Matching them by hand took a couple of minutes.

Footage that reads well

  • Close and tight on the work area

    Operators fill more of the frame, so faces, caps and vest numbers are visible.

  • Light on the front of the people

    The light sits behind the camera or to one side, not behind the operators.

  • Numbers, caps and fewer people

    A numbered vest settled which person was which in one trial, and a small group is easier to follow than a crowd.

  • 136 of 139 steps

    steps kept their wording and timing after the customer reviewed one study with a clear view (98%)

  • About one in three

    of the time in a two-hour clip of five people in identical vests across a wide bay could not be followed

Both figures come from real customer studies in September 2026. They show what camera position does; they are not a promise for your site.

Angle and distance

Where to put the camera

Start from the front-quarter, 4 to 6 m away. The arithmetic below shows why distance matters more than most people expect.

Plan view: a camera 5 m away at 45 degrees reads three operators; one 11 m away, backlit and behind a rack, loses one
Two camera positions for the same three operators, drawn to the same scale. Example layout from stated assumptions, not a measured site.

Direction: front-quarter, about 45 degrees

People standing in a row stack on top of each other when you look along the row, and you see their backs if you film from behind them. Standing across the line and a little in front separates them and shows faces and vest fronts. The AI is matching people from what it can see of them, so give it faces and numbers.

Height: head height or a little above

High enough to see past benches and bins, tilted down slightly. For a tripod that is roughly 1.7 to 2.5 m. This is a starting point, not a rule: check it with the pause test below on your own floor.

Distance: do the sum

The width of the scene is 2 x distance x tan(half the lens angle). For a phone's main camera we use 68 degrees, our calculation from Apple's 26 mm figure for the iPhone 15 Plus, so the scene is about 1.35 times the distance wide. A 0.7 m wide person then takes up 1920 x 0.7 / width pixels of a 1920 pixel wide 1080p frame.

Bar chart: a person is 332 pixels wide at 3 m and 83 pixels at 12 m in a 1080p frame, with three trial reference lines
How wide one 0.7 m person is in a 1080p frame at each distance, for a 68 degree lens. The dashed lines are reference-picture widths from one customer trial.
Scene width, person width and face width in pixels at each camera distance
Camera distanceScene widthPersonFace
3 m4 m332 px76 px
4 m5.4 m249 px57 px
5 m6.7 m199 px46 px
6 m8.1 m166 px38 px
8 m10.8 m125 px28 px
10 m13.5 m100 px23 px
12 m16.2 m83 px19 px

In one customer trial, the person the system lost time on had a reference picture 93 pixels wide. The two it followed were 123 and 177 pixels wide. Those widths match a 0.7 m person about 8 to 11 m from a 68 degree lens, so the table says what to avoid. It is one trial, not a threshold, and your lens and frame may differ.

Move the camera, do not zoom digitally

Digital zoom crops pixels you already have. If people look small, walk the camera closer. We have not measured whether 4K footage recovers small operators, so we do not ask for it: the supported footage is 1080p.

The pause test

Before you film for an hour, record 30 seconds, pause one frame at full screen and look. Can you tell who is who? Can you read the vest numbers? Repeat it for a frame near the start, middle and end of a cycle. If a person cannot tell, the AI will not either. Our team put it that way after a trial with a bright doorway behind the operators: at that distance and against that light, picking someone out is hard for a person and hard for the system.

Several operators

Telling people apart

A time study with more than one operator is where footage quality shows most. These tips came out of real multi-operator studies.

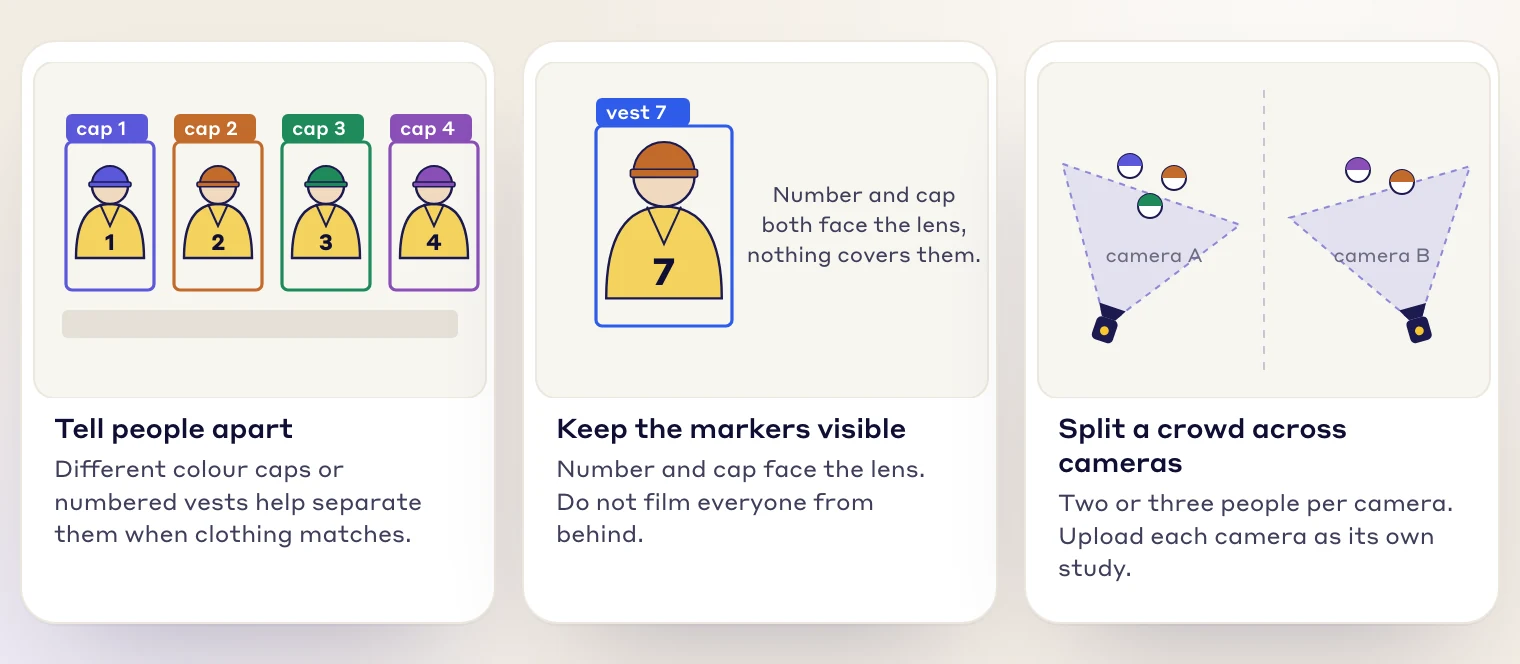
Three tips: colour caps to tell people apart, vest numbers facing the lens, and two cameras for a crowd
Three ways to make a group easier to separate. Illustration, not footage.

Tip: colour caps or numbered vests

One customer asked whether operators wearing different coloured caps would help the AI identify them. The answer from our team was that it should. We have not measured how much, so treat it as a cheap tip rather than a promise. Vest numbers did help in another trial: they made the match between two lists of operators unambiguous when the written descriptions were wrong in two cases. Keep the numbers facing the lens and clear of straps and tools.

Two or three people per camera

A clear view of a few people is the easy case. Five operators moving in and out of one wide frame for two hours is the hard one. The method texts agree on the shape of the plan: where several operators do the same job, time a short study of 10 to 15 cycles on each rather than one long study on a single person (NPTEL lecture 8).

A second camera should be close, not wide

Use it for the spot where people disappear behind equipment, and upload each camera as its own study. A second camera on the far side of the bay did worse than the first in one trial: only 3 of 5 operators were detected, because the operators were further away and smaller in the picture.

You confirm who is being studied

After upload you choose which people to study and exclude bystanders. The system may first split one person into several tracks, and you merge them. In the five-person trial this took a couple of minutes and was more reliable than any automatic choice. If you want to recheck one operator, you can do that without rerunning the study.

Light and line of sight

Backlight and things in the way

The two causes of lost people that no software setting fixes.

Backlight turns people into silhouettes

In the trial above, one operator stood in a bright open doorway with the light behind her. Her face could not be made out and the colours of her clothing were washed out, so the system had a poor reference picture of her for the rest of the video. Check what is behind the operators, not just what is on them.

  • Put windows, open doors and bright lights behind the camera or off to one side.
  • Keep direct sun off the camera as well: heat is a separate problem, covered below.
  • If you cannot move the camera, close the door or blind for the study.

Walk the line of sight

Stand where the lens will be and look at every station. Racks, columns, panels and parked trucks all hide people. Spans the AI could not follow are marked for you to check rather than guessed, which is honest but leaves you the work. In the two-hour trial, 16 minutes of activity at the far end of the bay were out of view and were flagged instead of guessed.

Keep the whole job in frame

People walk to a bin or a cart for parts. If that trip leaves the frame, the element ends when they step out. Frame wide enough to include it, then move closer in the other direction by changing the camera position.

Resolution and file size

1080p, and the sum behind your files

Larger files are slower to upload and heavier to store. Work out the size before you film, not after.

The time and motion study page asks for standard 1080p smartphone footage and says single uploads can be up to 4 hours. 1080p is 1,920 by 1,080 pixels (GoPro's HERO13 Black settings page). 4K has four times the pixels, so it needs more storage, more heat and more upload time for a picture that LeanSuite does not ask for.

File size is bit rate times time

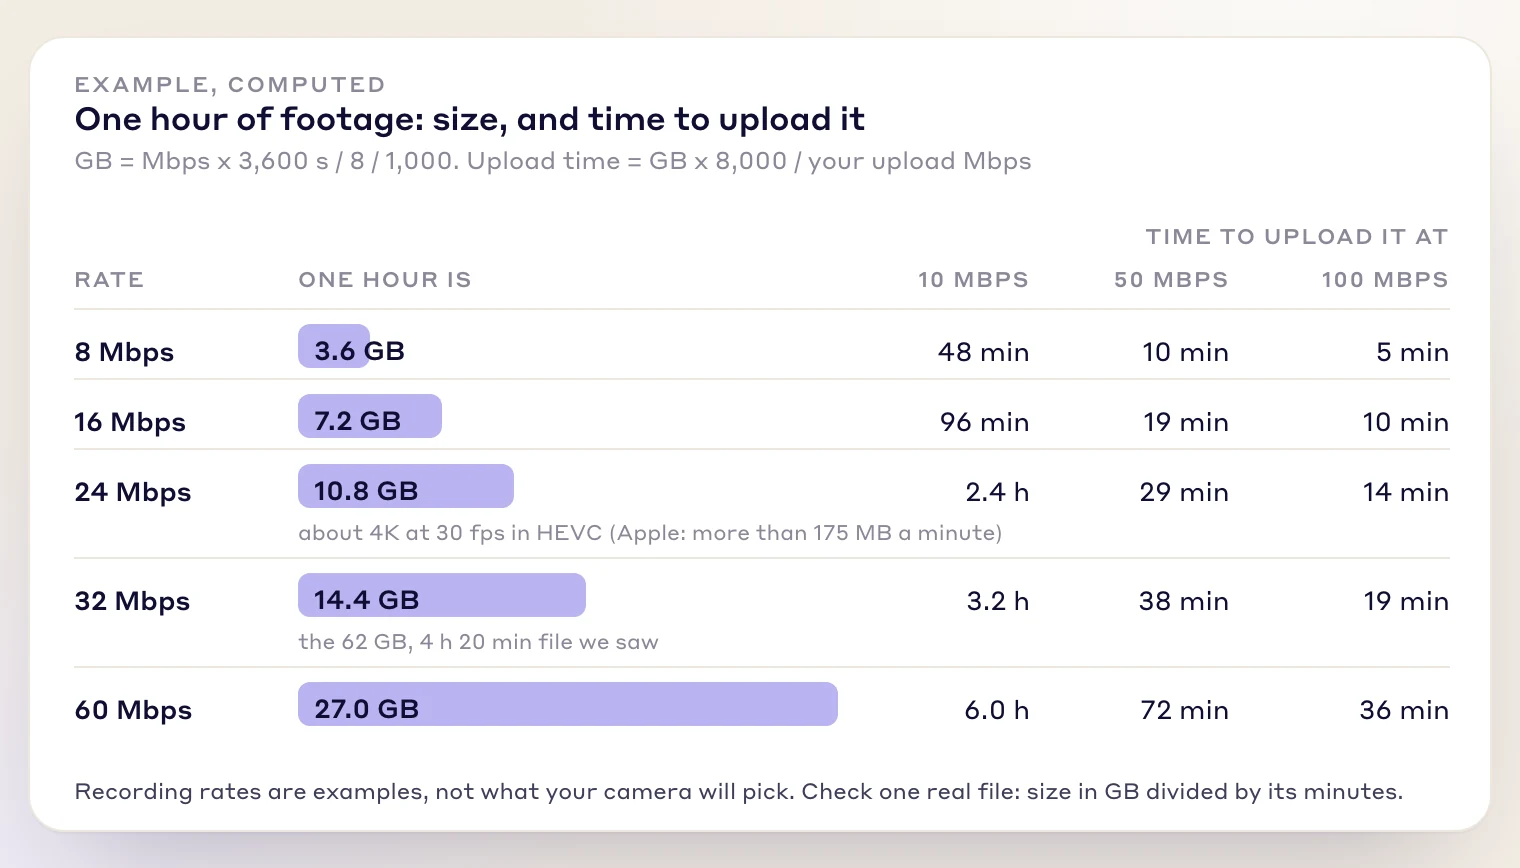
Gigabytes per hour = megabits per second x 3,600 / 8 / 1,000. Cameras use a variable bit rate: GoPro says the more complex the scene and the longer the recording, the higher it goes. So check one real file from your camera: divide its size in gigabytes by its length in minutes.

Two real anchors. Apple says one minute of 4K at 30 fps in HEVC may use more than 175 MB, which is about 23 megabits per second. And one customer recording of 4 hours 20 minutes came to 62 GB, about 32 megabits per second, or 14.4 GB an hour.

Table of one hour of footage at 8 to 60 Mbps, from 3.6 to 27 GB, with upload times at 10, 50 and 100 Mbps
One hour of video at five example recording rates, and how long that hour takes to upload. Computed, not measured.

What happened to large files in practice

In one customer's first weeks, files from three cameras ran from 3 to 10 GB each, and one upload sat at 68% for over an hour. The upload has to finish before analysis can start. So record at 1080p, upload on a wired or strong connection, and start the upload while you can still reshoot.

Camera settings that change the picture while you film are worth turning off: on iPhones, Auto FPS can drop the frame rate to 24 fps in low light, and Lock Camera stops automatic switching between lenses (Apple's iPhone guide).

Battery, storage and heat

Plan the power before the shift

A camera that stops at minute 70 of a 2-hour study costs more than the study did.

  • More than 2.5 hours

    GoPro HERO13 Black Enduro battery at 1080p30, GoPro's figure

  • More than 1.5 hours

    the same battery at 4K30 or 5.3K30, GoPro's figure

  • 0 to 35 degrees Celsius

    ambient range Apple designs iPhone and iPad for

Battery

GoPro rates the HERO13 Black's 1900 mAh Enduro battery at more than 2.5 hours of continuous recording at 1080p30 and more than 1.5 hours at 4K30 or 5.3K30, measured at 25 C with screens on. A warm shop will not match that. A 2 hour take at 1080p needs 1 battery on paper and a 4 hour take needs 2; at 4K30 the 4 hour take needs 3. For long takes use external power: GoPro says to supply at least 2 A at 5.1 V. For a phone, use a power bank and a mount that holds it steady.

Card and storage

Hours a card holds = card size in GB / GB per hour. At 14.4 GB an hour, a 128 GB card holds 8.9 hours. GoPro asks for a V30 or UHS-3 microSD card, and says older, slower cards make the camera work harder. Check free space before you start, and keep your own copy of the original until the study has been checked.

Heat

When a GoPro gets too hot it shows "Camera is too hot", saves the recording and powers off. GoPro's tips for longer recordings: shade the camera, add some airflow, lift it off a flat surface, lower the resolution or frame rate, turn HyperSmooth down for a static shot, turn off GPS and voice control, and turn off the screens. Apple says iPhones are designed for ambient temperatures of 0 to 35 C, that heavy camera use warms them, and that a hot phone can lower frame rates in some apps. A phone in direct sun on a hot floor is a risk.

One continuous take

Do not assemble the footage first

Time studies read time off the video, so the video has to be the real, unbroken thing.

Record each cycle or each process step as one continuous take, and upload each take as one file. Do not cut clips together before you upload. Our advice to a customer who was assembling cuts into one video was to record in one go instead: assembling cuts breaks the time study, because the gaps are not real time.

  • Start recording before the first cycle and stop after the last. Do not pause in between.
  • Keep takes under the 4 hour single-upload limit on the time and motion study page.
  • If the camera must stop, stop between cycles, name the files in order (bracket-assembly-part-1-of-3) and upload each one. Each file is its own study, and you can compare studies side by side.
  • Log each file with its clock time and what happened on the shot log in the checklist below.

Guide the AI

Name the process and its steps first

Before you upload, give the process a name, a short description and its steps, in your plant's own words.

In one customer study, the labels moved onto the plant's own phrasing once the process steps were in, so a study reads the way the team talks. The same trial showed the other side: phrases from a first study were reused in a place where they did not fit, so check the first minutes of the output against the video.

Example, sample data

Station 3: bracket assembly

Operator fetches a bracket from the line-side bin, seats it in the jig, an auto-feed driver runs four screws, and the operator removes the part.

  1. Fetch bracket from the bin. Ends when the bracket is in the hand.
  2. Seat bracket in the jig. Ends when it sits on the locating pins.
  3. Drive four screws (machine). Ends when the driver stops.
  4. Remove the part. Ends when it is in the finished-parts tray.

The method text (NPTEL lecture 8) gives the rules to follow when you split a job: keep elements as short as can be timed accurately, separate manual work from machine work, separate steps that do not happen every cycle, and make the start and end of each element easy to see. A step that ends at something visible in a paused frame, like a part landing in a tray, is a step a person can check later.

After the upload

Check it, correct it, certify it

The AI does the timing and the first description. You settle what it was unsure about.

  1. Confirm the operators

    Pick who you are studying, exclude bystanders and merge any person who was split into two tracks.

  2. Read the first five minutes against the video

    Wrong labels are easiest to spot early. A step named for a part that has not arrived yet is the common slip.

  3. Settle the spans it could not follow

    Stretches the AI could not see are flagged for review instead of being given a confident name.

  4. Recheck one operator if needed

    You can recheck a single operator without rerunning the whole study.

  5. Certify the study

    A certified study becomes the reference for later studies of the same process.

What you get from a checked study, and what it feeds, is on the time and motion study page. The same footage can go on to line balancing, and AI video analysis explains all six studies it supports.

Worked example

Planning a two-hour study of one cell

Sample data: a cell 6 m wide, three operators, one fixed camera. Every figure is computed from the assumptions on this page.

Example plan for a two-hour study with sample data
QuestionWorkingAnswer
Where does the camera go?5 m away: scene is 1.35 x 56.7 m wide, fits the 6 m cell
How big is each person?1920 x 0.7 / 6.7about 199 px
How big is the file?32 Mbps x 3,600 x 2 / 8 / 1,00028.8 GB
How long to upload?28.8 GB x 8,000 / 50 Mbps / 60about 77 minutes
How many hours fit a card?128 GB / 14.4 GB an hour8.9 hours
How many batteries?2 h / 2.5 h rated1, or external power

Result: one camera at 5 m covers the cell with each person about 199 pixels wide, makes about 28.8 GB, takes about 77 minutes to upload on a 50 Mbps connection and fits on one card. A 4 hour take at the same rate would be 57.6 GB.

Before you press record

The pre-shoot checklist

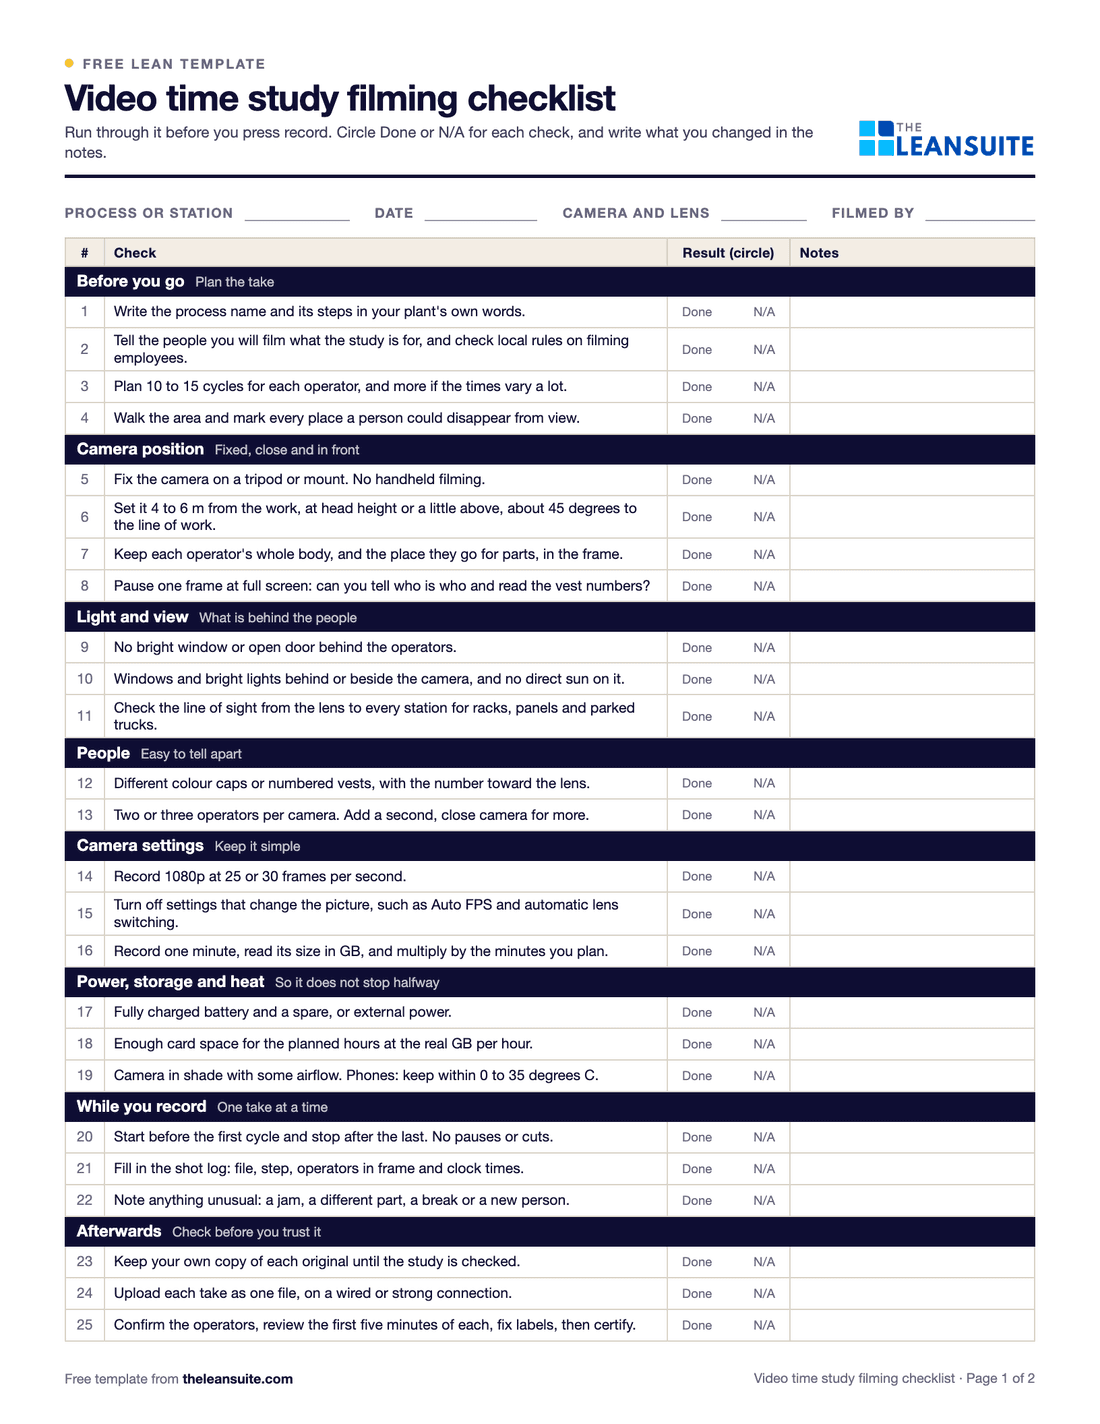
Everything above as one list. Print it, or download it with a shot log for each take.

Before you go

  • Write the process name and its steps in your plant's own words.
  • Tell the people you will film what the study is for, and check local rules on filming employees.
  • Plan 10 to 15 cycles for each operator, and more if the times vary a lot.
  • Walk the area and mark every place a person could disappear from view.

Camera position

  • Fix the camera on a tripod or mount. No handheld filming.
  • Set it 4 to 6 m from the work, at head height or a little above, about 45 degrees to the line of work.
  • Keep each operator's whole body, and the place they go for parts, in the frame.
  • Pause one frame at full screen: can you tell who is who and read the vest numbers?

Light and view

  • No bright window or open door behind the operators.
  • Windows and bright lights behind or beside the camera, and no direct sun on it.
  • Check the line of sight from the lens to every station for racks, panels and parked trucks.

People

  • Different colour caps or numbered vests, with the number toward the lens.
  • Two or three operators per camera. Add a second, close camera for more.

Camera settings

  • Record 1080p at 25 or 30 frames per second.
  • Turn off settings that change the picture, such as Auto FPS and automatic lens switching.
  • Record one minute, read its size in GB, and multiply by the minutes you plan.

Power, storage and heat

  • Fully charged battery and a spare, or external power.
  • Enough card space for the planned hours at the real GB per hour.
  • Camera in shade with some airflow. Phones: keep within 0 to 35 degrees C.

While you record

  • Start before the first cycle and stop after the last. No pauses or cuts.
  • Fill in the shot log: file, step, operators in frame and clock times.
  • Note anything unusual: a jam, a different part, a break or a new person.

Afterwards

  • Keep your own copy of each original until the study is checked.
  • Upload each take as one file, on a wired or strong connection.
  • Confirm the operators, review the first five minutes of each, fix labels, then certify.

Free printable

Video time study filming checklist

A pre-shoot checklist and shot log for filming a time study on video: camera, light, people, settings, power and review.

Page 1 of the video time study filming checklist

Honest limits

What good footage cannot do

Better footage helps a lot. It does not make these go away.

  • It cannot follow someone it cannot see. Hidden or tiny people are flagged for you to check.
  • You review every study. The AI gets you most of the way; you correct it and certify it, and the work you save is the stopwatch, not the judgment.
  • Colour caps are a tip, not a feature or a promise. We have not measured how much they help.
  • This guide covers video files you record and upload. It does not cover live or fixed security-camera feeds.
  • Footage of people at work is personal data in many places. Tell the people you film what the study is for, and check local rules and any works council agreement before you start. This page is not legal advice.
  • Numbers on this page are computed examples or one-trial observations. Measure your own site.

FAQs

Filming questions, answered

  1. Film from the front-quarter, about 45 degrees to the line of work, at head height or a little above and tilted slightly down. Keep the light behind the camera and 4 to 6 m from the operators. Then pause a frame at full screen: if you cannot tell who is who, the AI will struggle too.

  2. No. LeanSuite's time and motion study page asks for standard 1080p smartphone footage. 4K has four times the pixels, so files are far larger and cameras run hotter. If people look too small, move the camera closer before you raise the resolution.

  3. There is no fixed number, but fewer is better. In one customer trial, a study with a clear view kept 136 of 139 steps unchanged after review, while five people in identical vests across a wide bay left about a third of the time unfollowed. Aim for two or three per camera and use a second camera for the rest.

  4. It is harder. Different colour caps or numbered vests should help the AI tell people apart, but we have not measured how much, so treat it as a tip. In one trial the vest numbers made matching operators unambiguous. You also confirm who is being studied before the analysis, and can merge duplicates.

  5. Size is bit rate times time: 32 Mbps is about 14.4 GB an hour, and one 4 hour 20 minute file we saw was 62 GB. The time and motion study page says single uploads can be up to 4 hours. Check one real file from your camera, then plan the upload before the shift ends.

  6. Review the first five minutes of each operator against the video, fix the labels, then certify the study. Stretches the AI could not follow are marked for you to check rather than guessed. Naming the process and its steps first makes wrong labels rarer.

Sources

Where the facts come from

Camera facts are from the makers' support pages. Method facts are from a university lecture series and an industrial engineering magazine. Trial figures are from LeanSuite customer studies.

Film one process and see the study

Bring one video of your line and see the time and motion study it produces, or run a 90-day pilot on your own lines.