
Free template
Updated
Job safety analysis (JSA) template
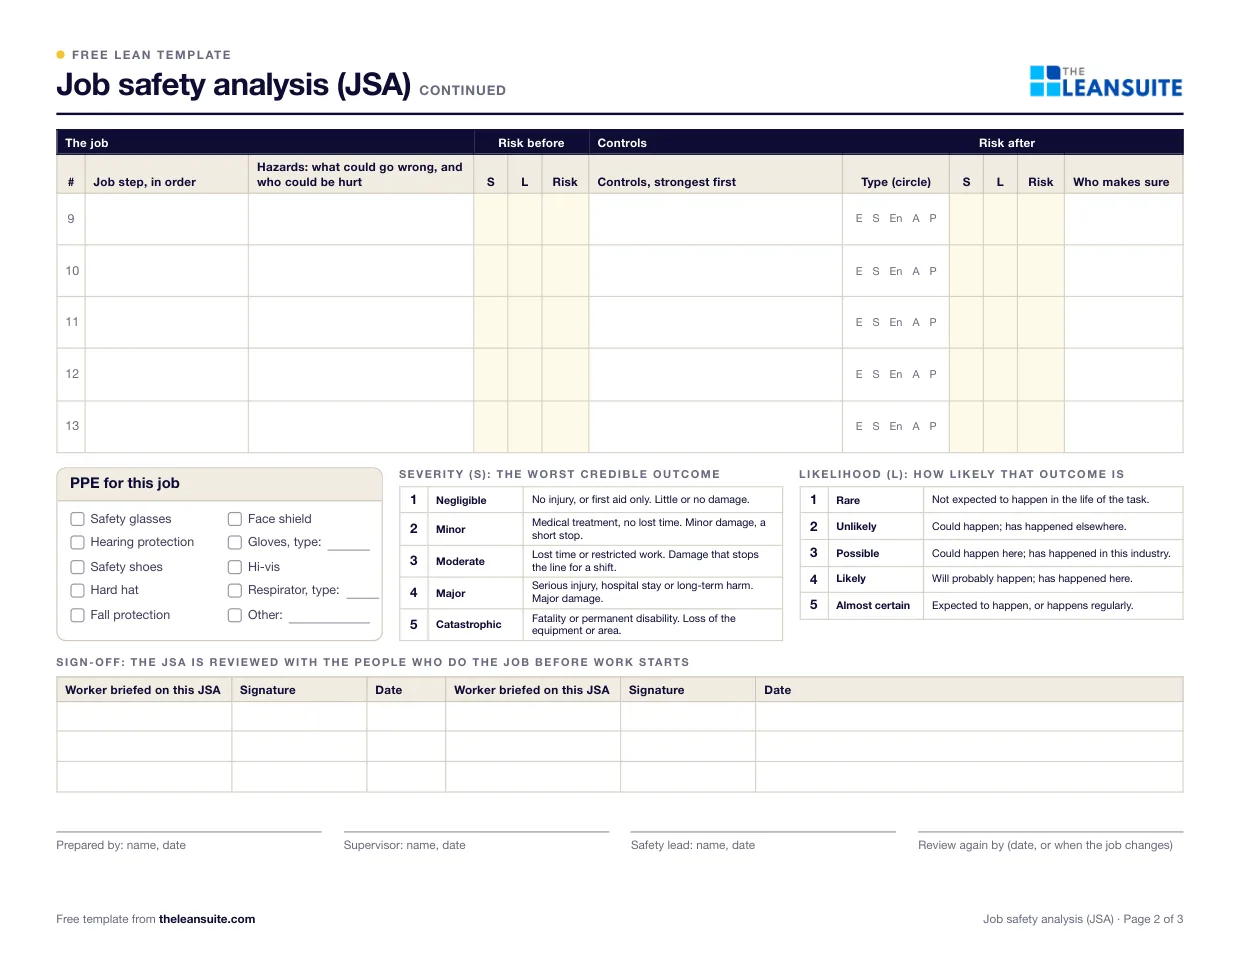
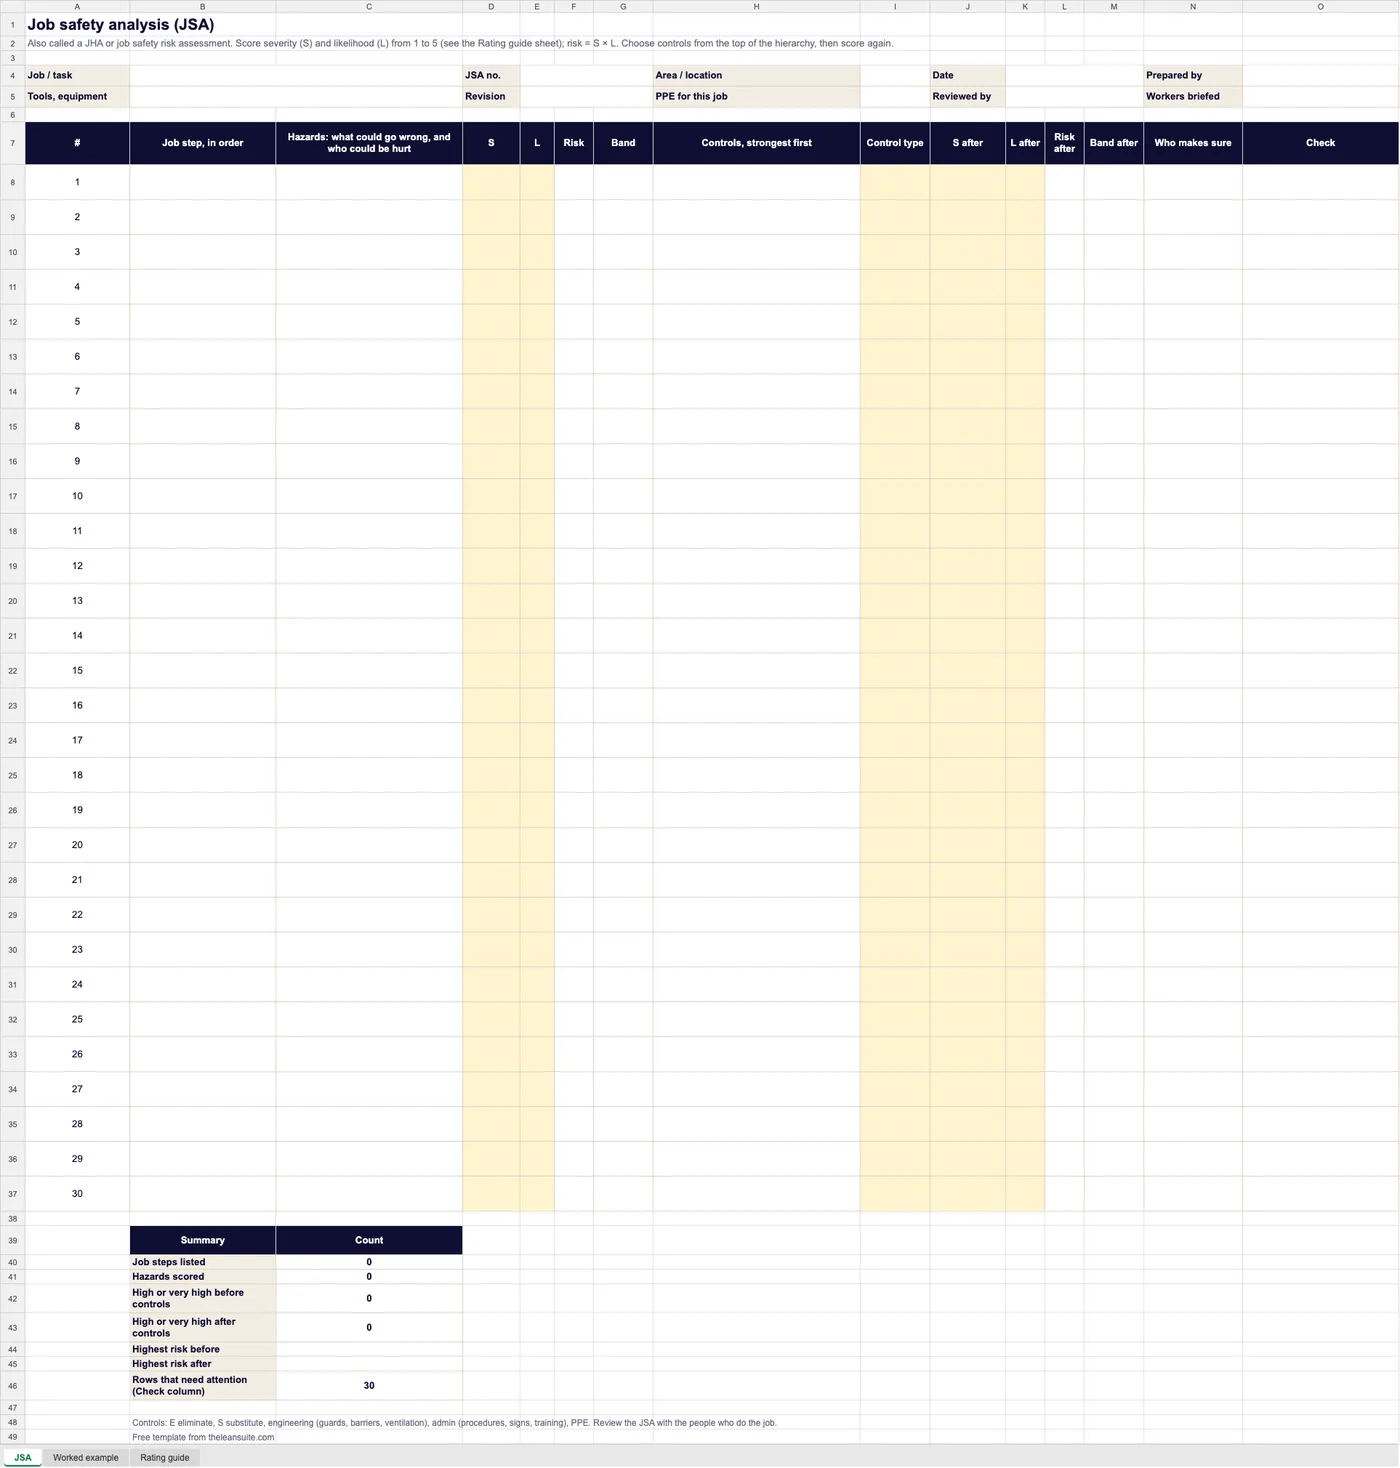
A job safety analysis, also called a job hazard analysis, breaks one job into steps, lists the hazards at each step and records the controls that make the step safe. You fill it in before the work starts, with the people who do the job. The same method goes by several names: job hazard analysis (JHA), job safety risk assessment (JSRA) or task risk assessment. The names are used interchangeably, and the sheet is the same. This template scores each hazard for severity and likelihood from 1 to 5 before the controls, asks for controls from the top of the hierarchy (eliminate, substitute, engineer, administrative controls, then PPE), and scores the risk again with the controls in place. Page 2 has more rows, the PPE for the job, the rating guide and a sign-off for the people briefed on it, and page 3 is a filled-in example of six steps. The Excel version works out both risk scores and their bands, flags any step still high after the controls and has the same example on its own sheet. The Word version has the blank sheet as tables you can type in.
Free to use: print it, copy it and edit it for your team. Enter your name and work email once to download.
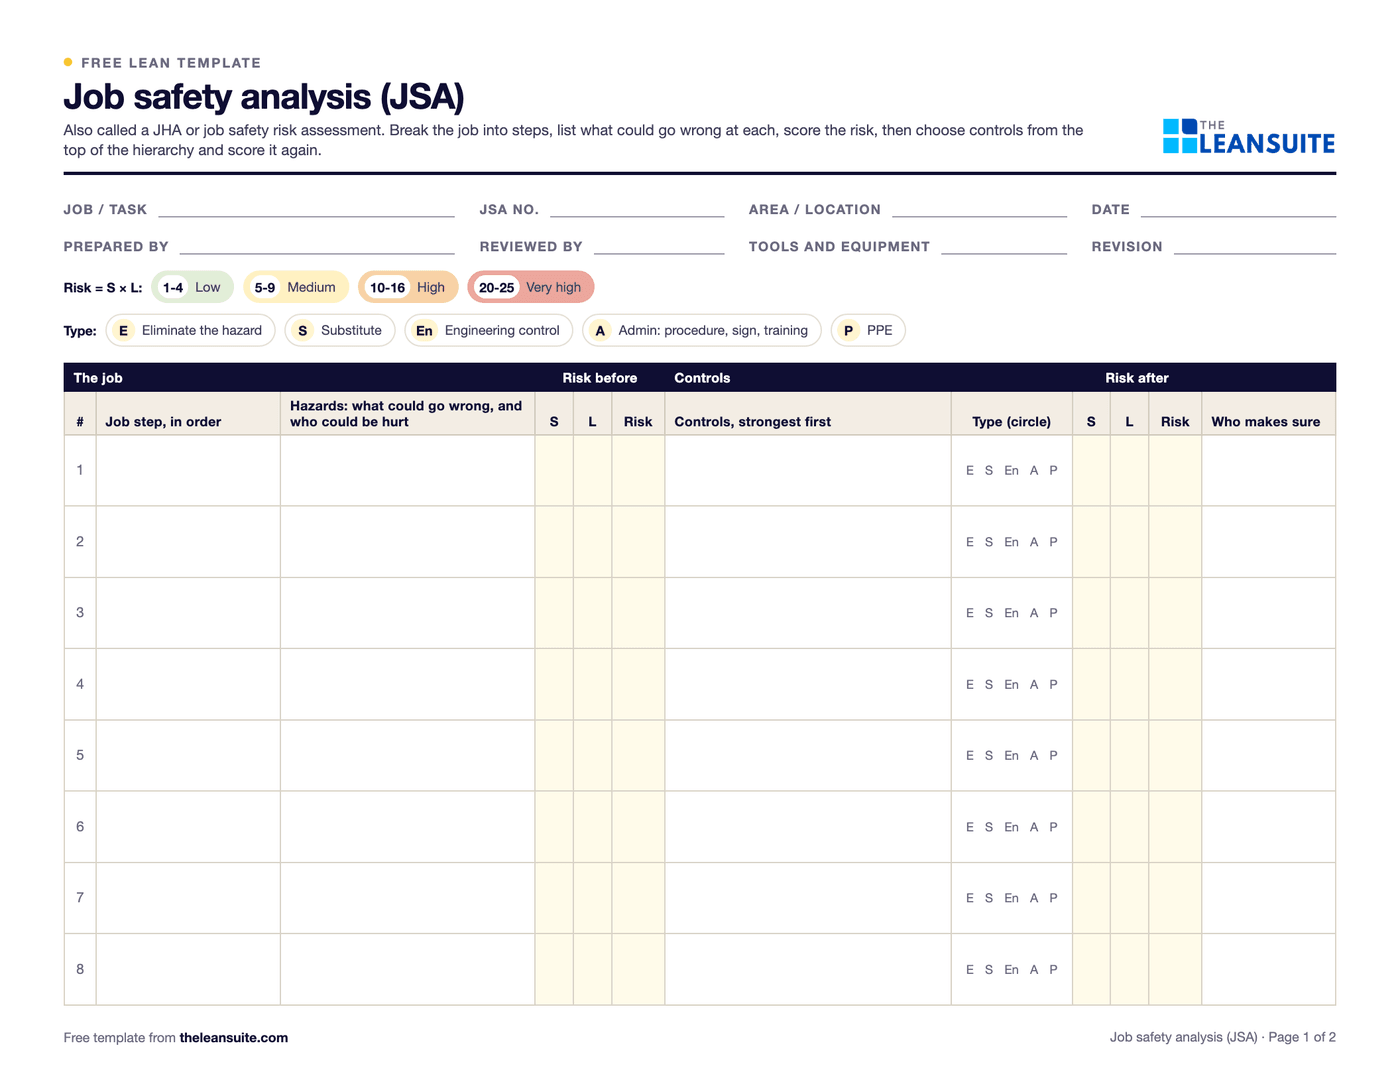 Fields for the job, area, date and who prepared it, a key for the risk bands and control types, and a table with columns for the job step, hazards, severity, likelihood and risk before, the controls and their type, risk after and who makes sure.
When to use it
When to use a job safety analysis
- Before a new job, a new machine or a changed process goes live.
- For jobs with a history of injuries or near misses, and for jobs where a mistake could be serious.
- For non-routine work such as maintenance, cleaning inside machines or working at height.
- To train a new starter on how a job is done safely, step by step.
- Before work that also needs its own procedure or permit, such as lockout, confined-space entry, hot work or work at height: the JSA comes first and does not replace them.
How to fill it in
- 1
Pick the job and the team
One job per sheet. Fill it in with the people who do the job, not only the safety lead. - 2
Break it into steps
Watch the job and write the steps in order, in a few words each. Most jobs have five to twelve steps. - 3
List the hazards at each step
What could go wrong and who could be hurt: caught in, struck by, cut, lifting strain, a fall, a chemical, noise. - 4
Score the risk before controls
Severity (the worst credible outcome) times likelihood, each from 1 to 5, using the guide on page 2. - 5
Choose controls, strongest first
Remove the hazard if you can, then substitute, then engineering controls such as guards, then procedures and training, and PPE last. Circle the type. - 6
Score again and sign off
Score the risk with the controls in place, list the PPE, and brief the people who do the job before they start.
What is in the download
Every page and every sheet of the Job safety analysis (JSA) template
3 PDF pages and 3 Excel sheets, as they come. The Word file has the same pages as the PDF, as tables you can type in. The worked examples use made-up numbers.
PDF, 3 pages
 Open full size (opens the picture in a new tab)
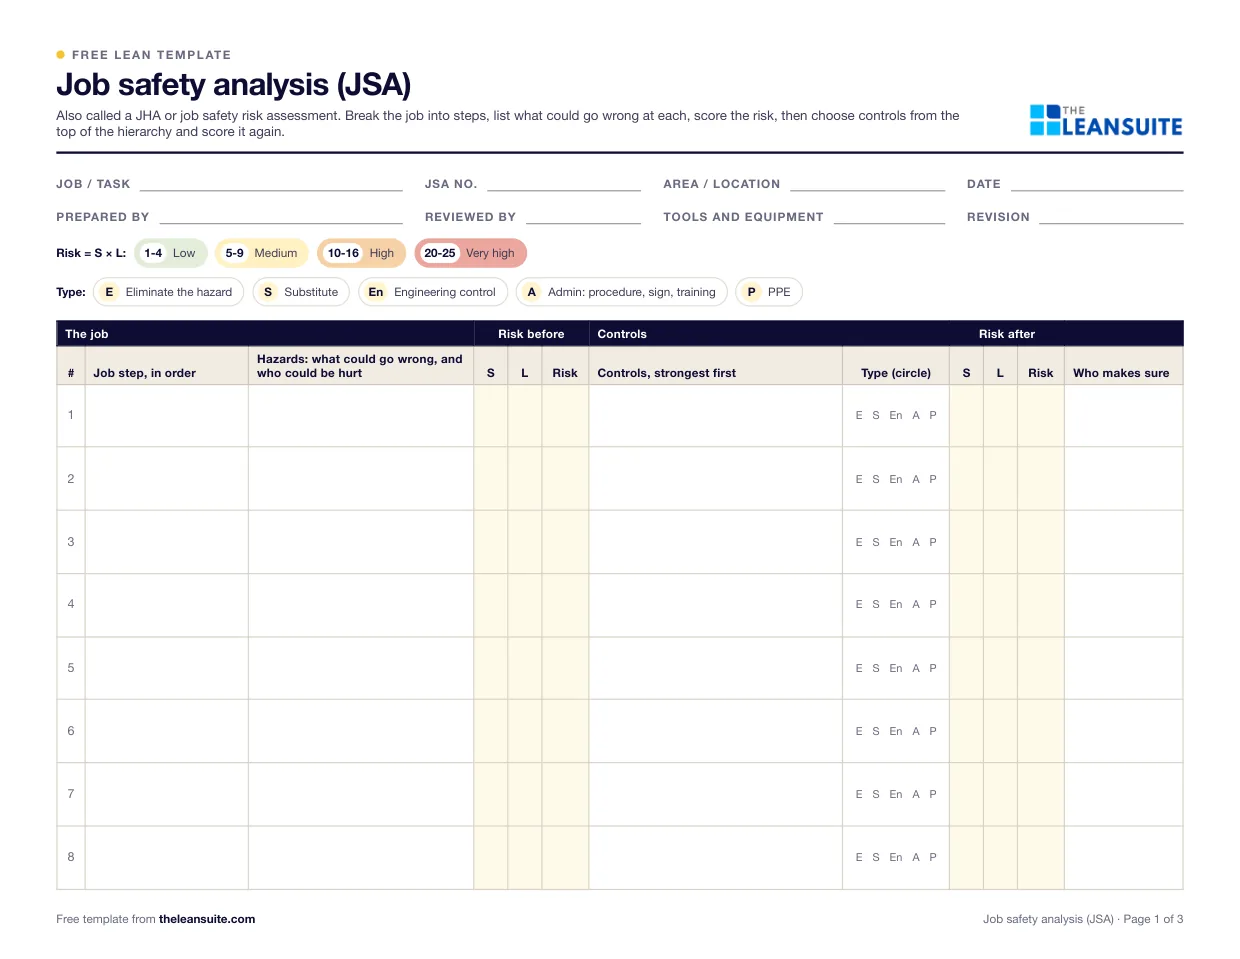
Page 1: header and steps 1 to 8 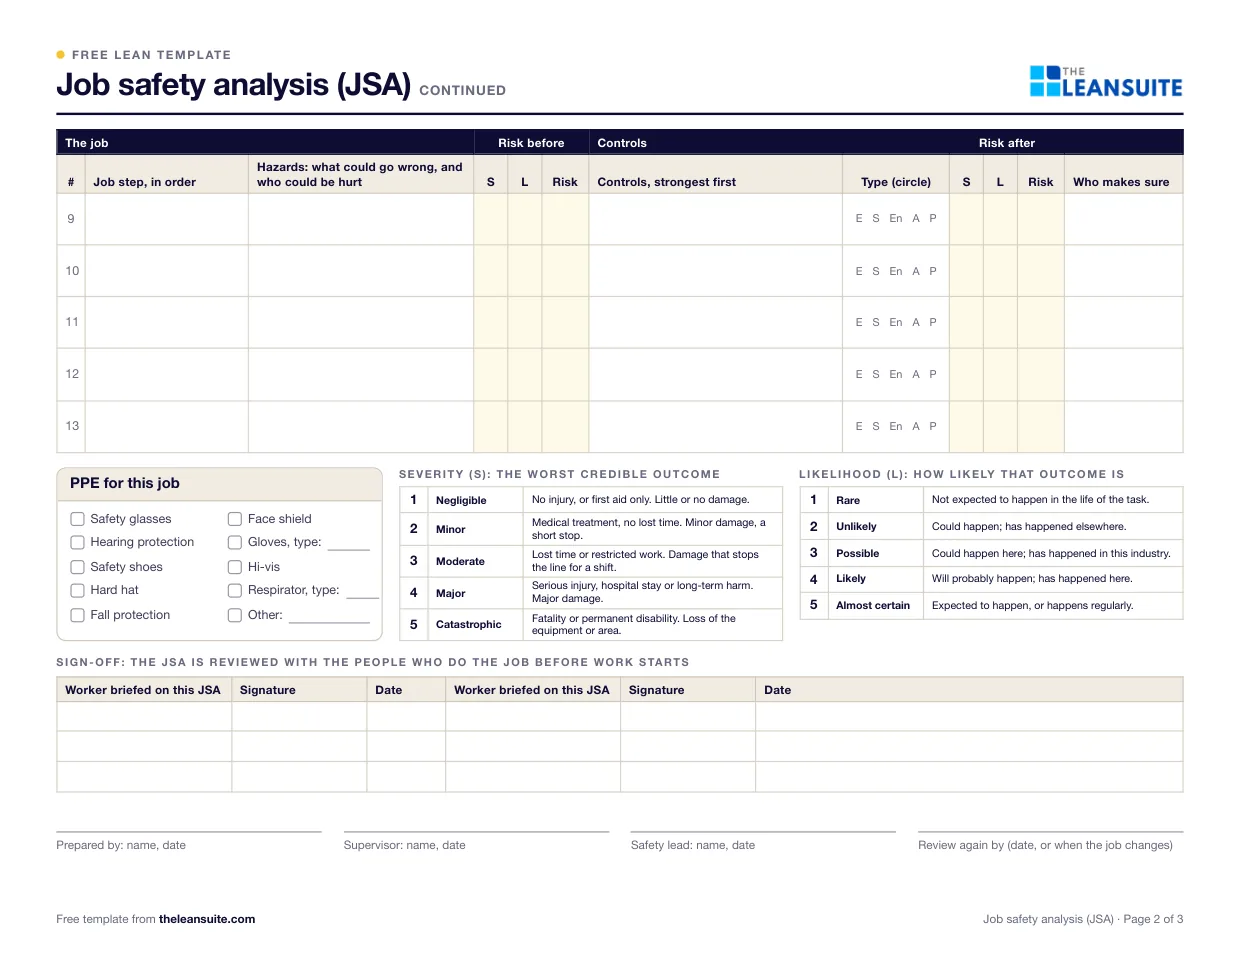 Open full size (opens the picture in a new tab)
Page 2: steps 9 to 13, PPE, rating guide, sign-off 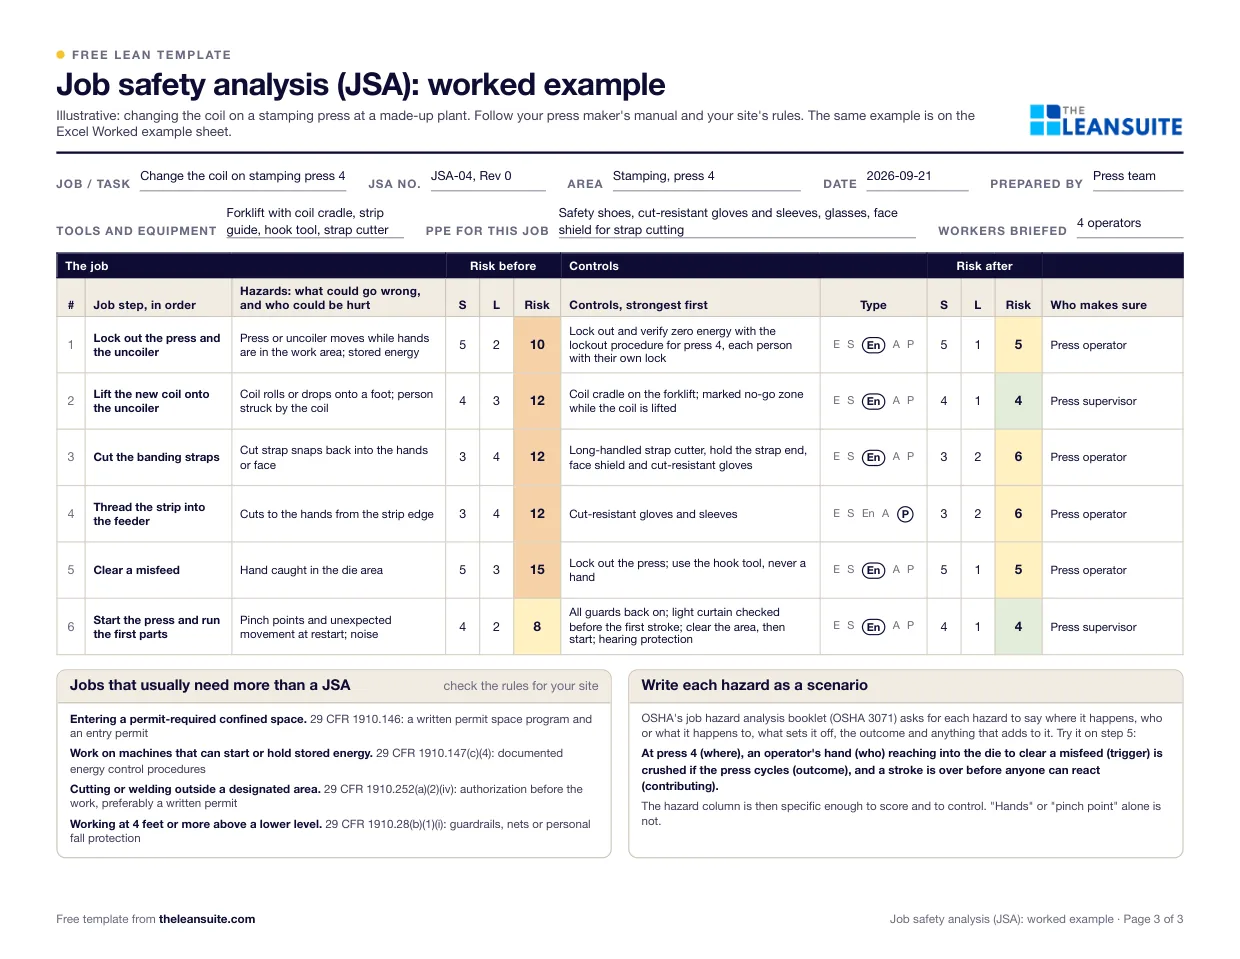 Open full size (opens the picture in a new tab)
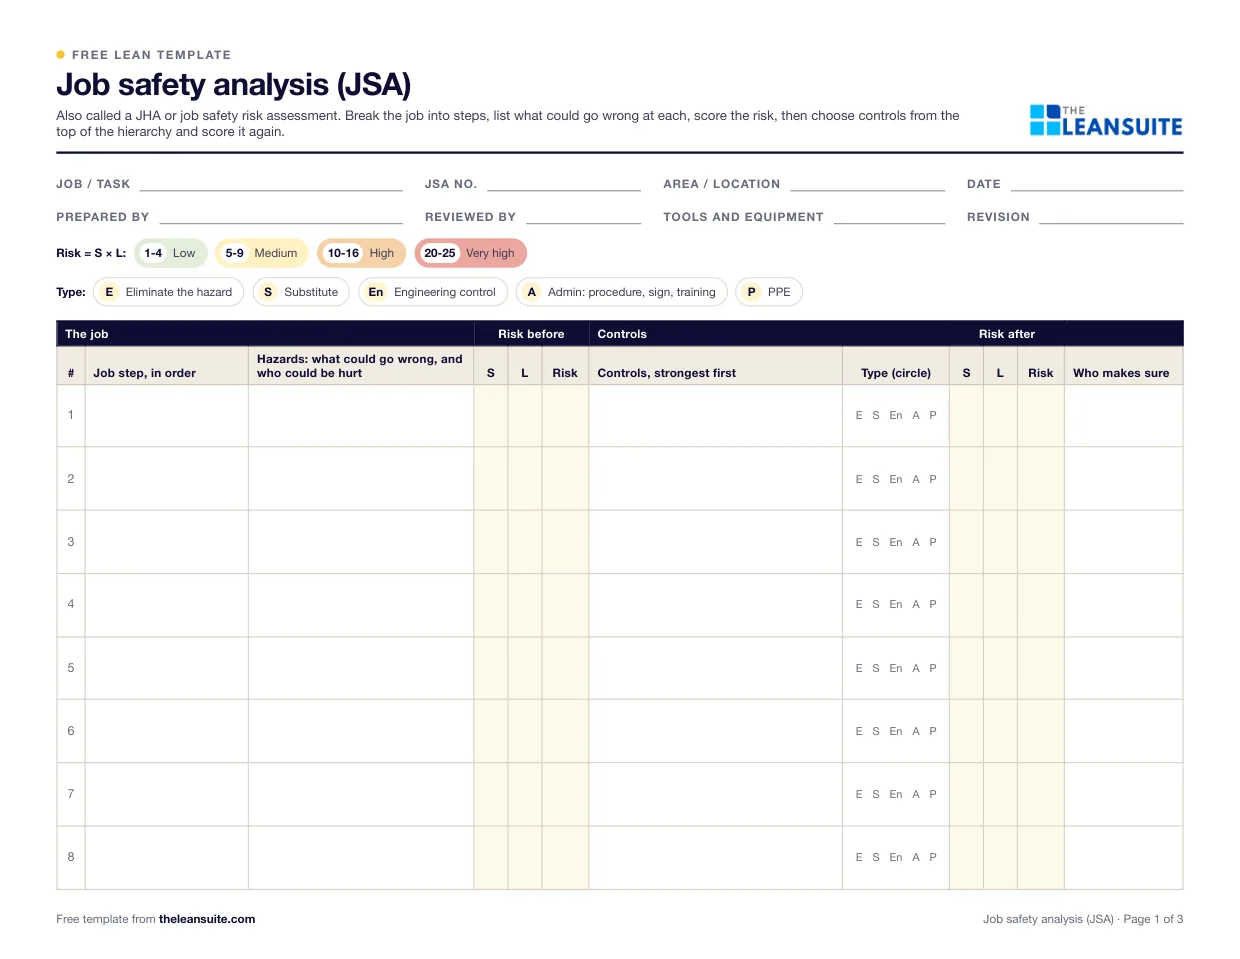
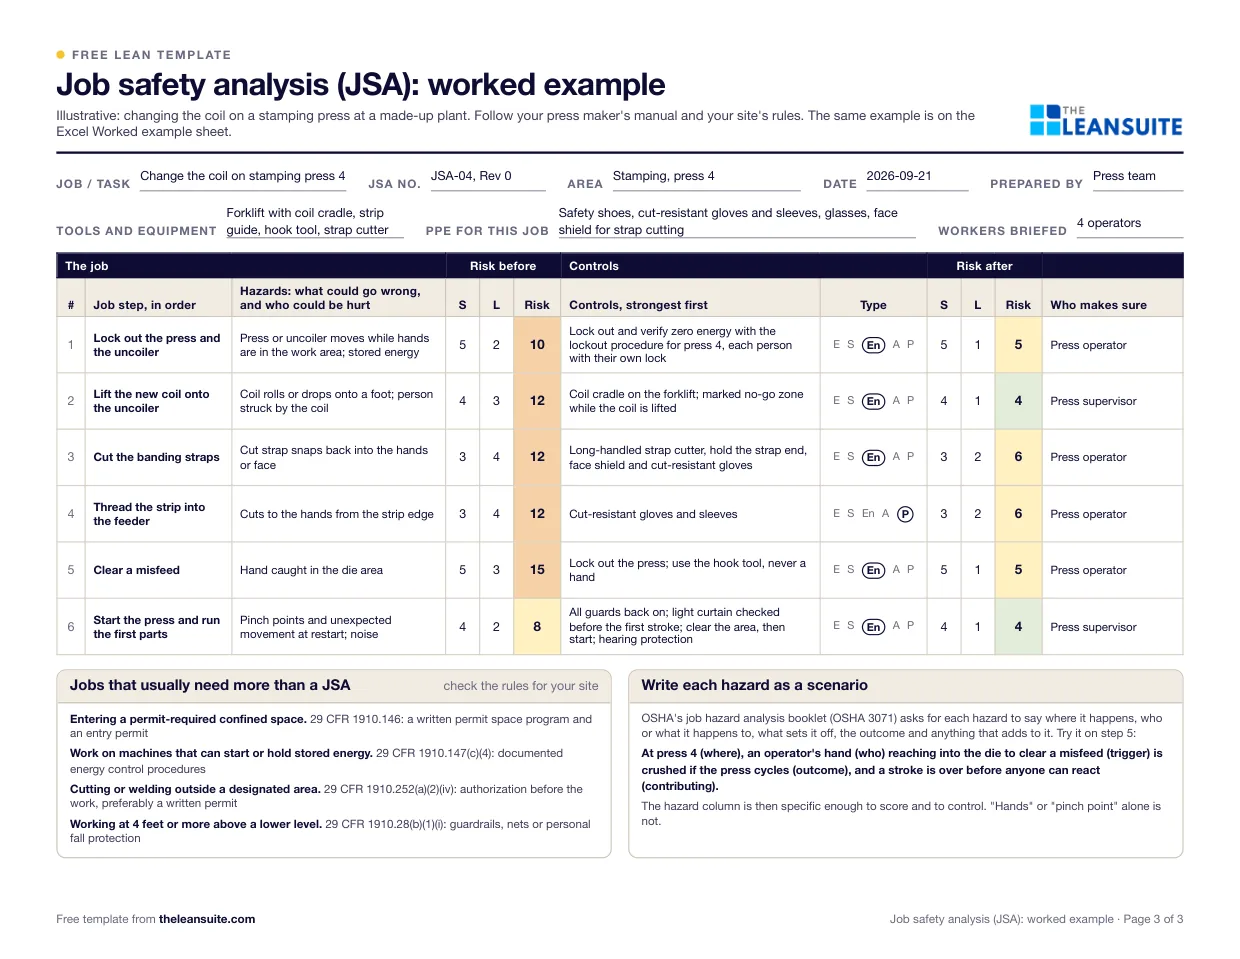
Page 3: a filled-in example
Excel, 3 sheets
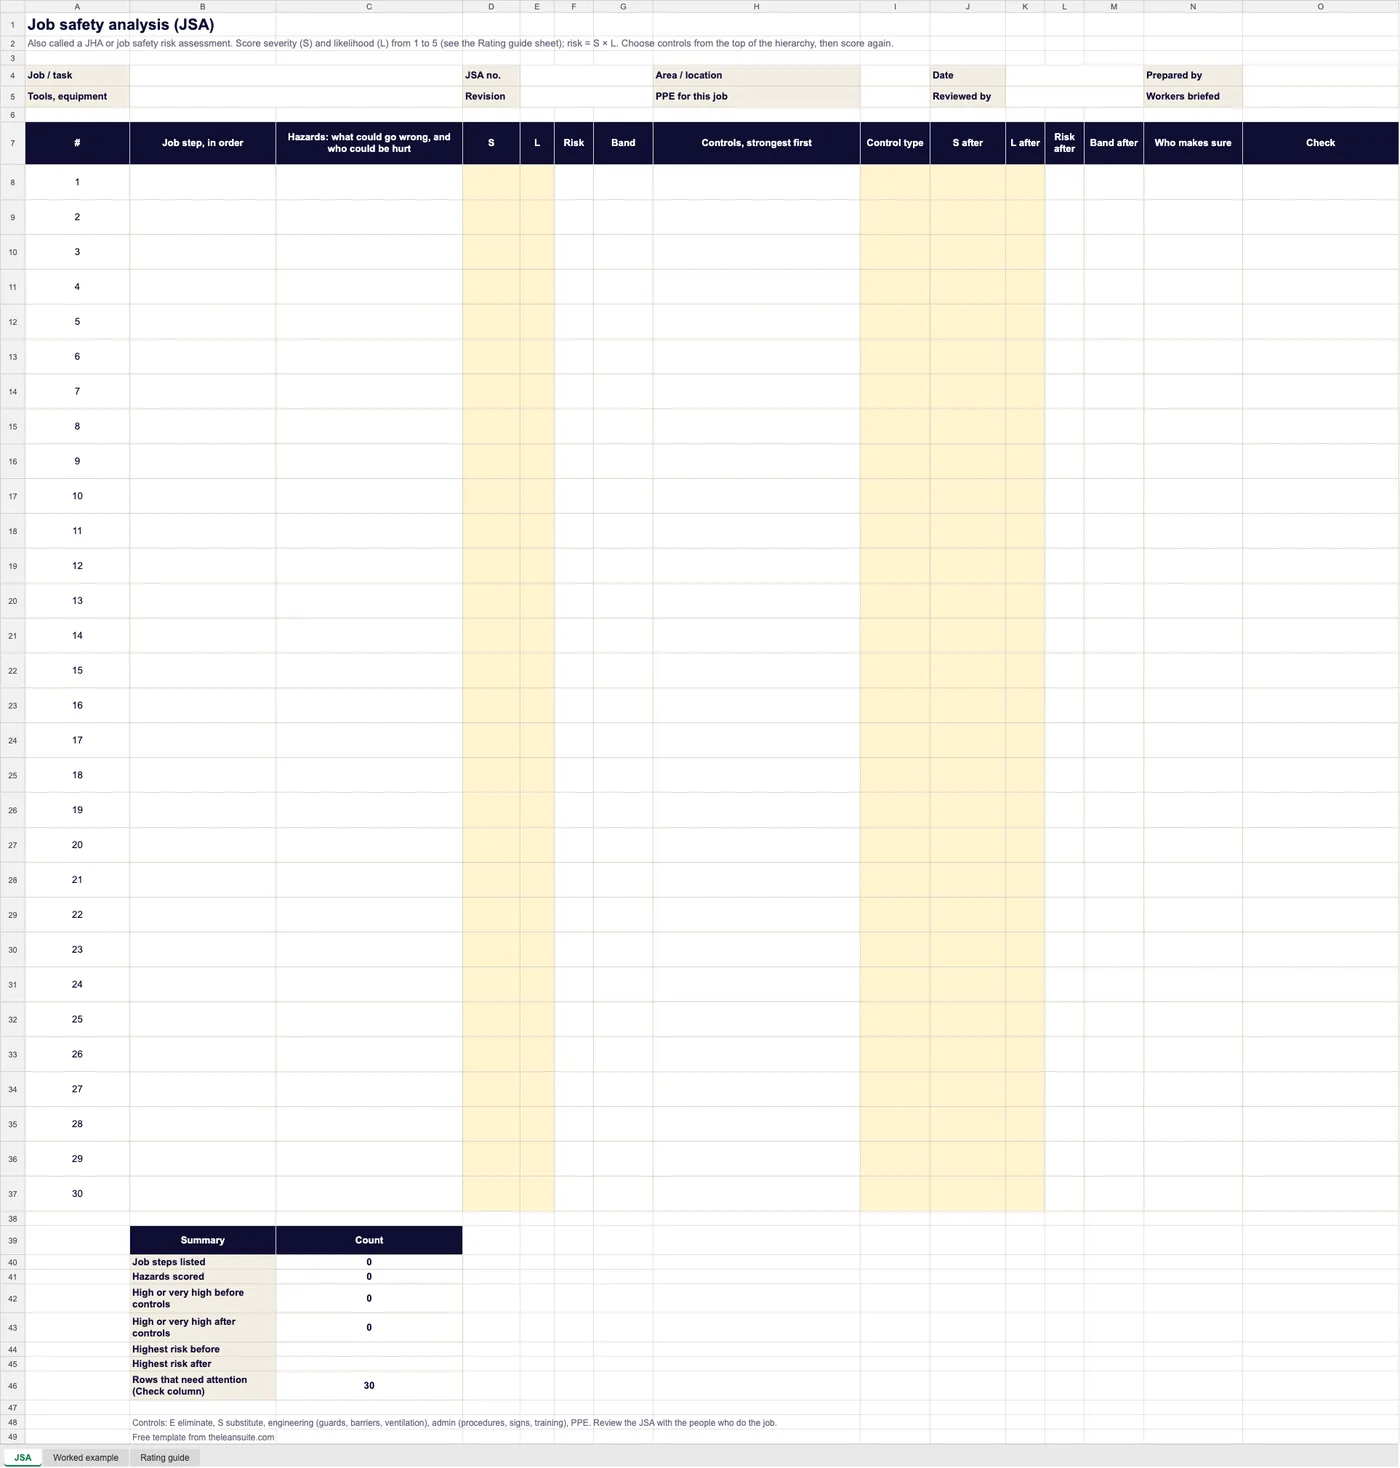
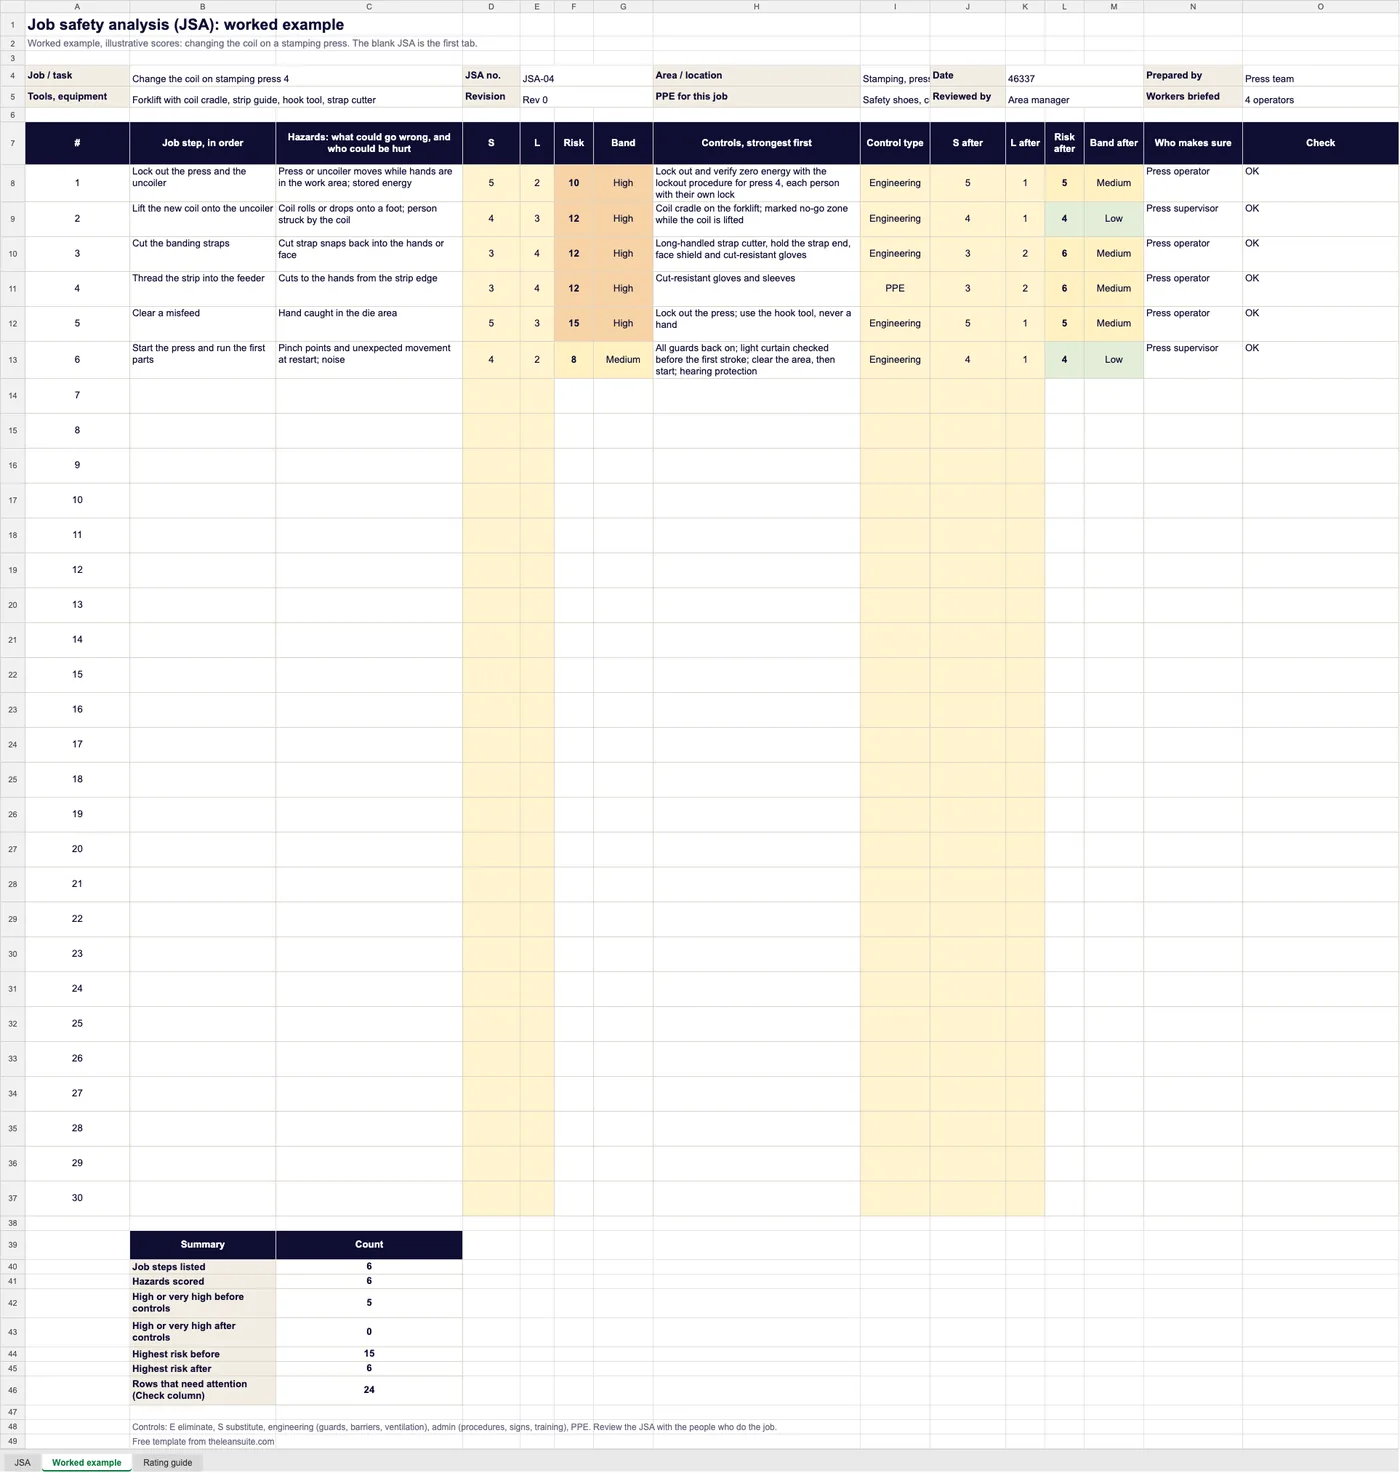
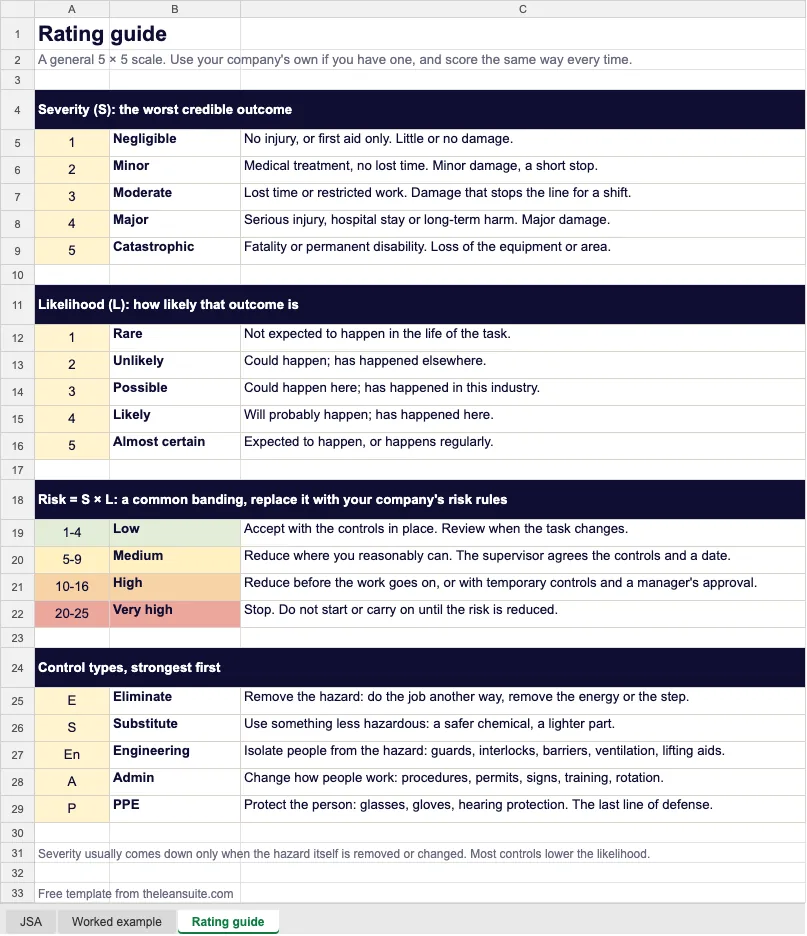
The pictures show the top of each sheet with the formulas worked out; the file keeps every row.
 Open full size (opens the picture in a new tab)
Sheet 1: JSA 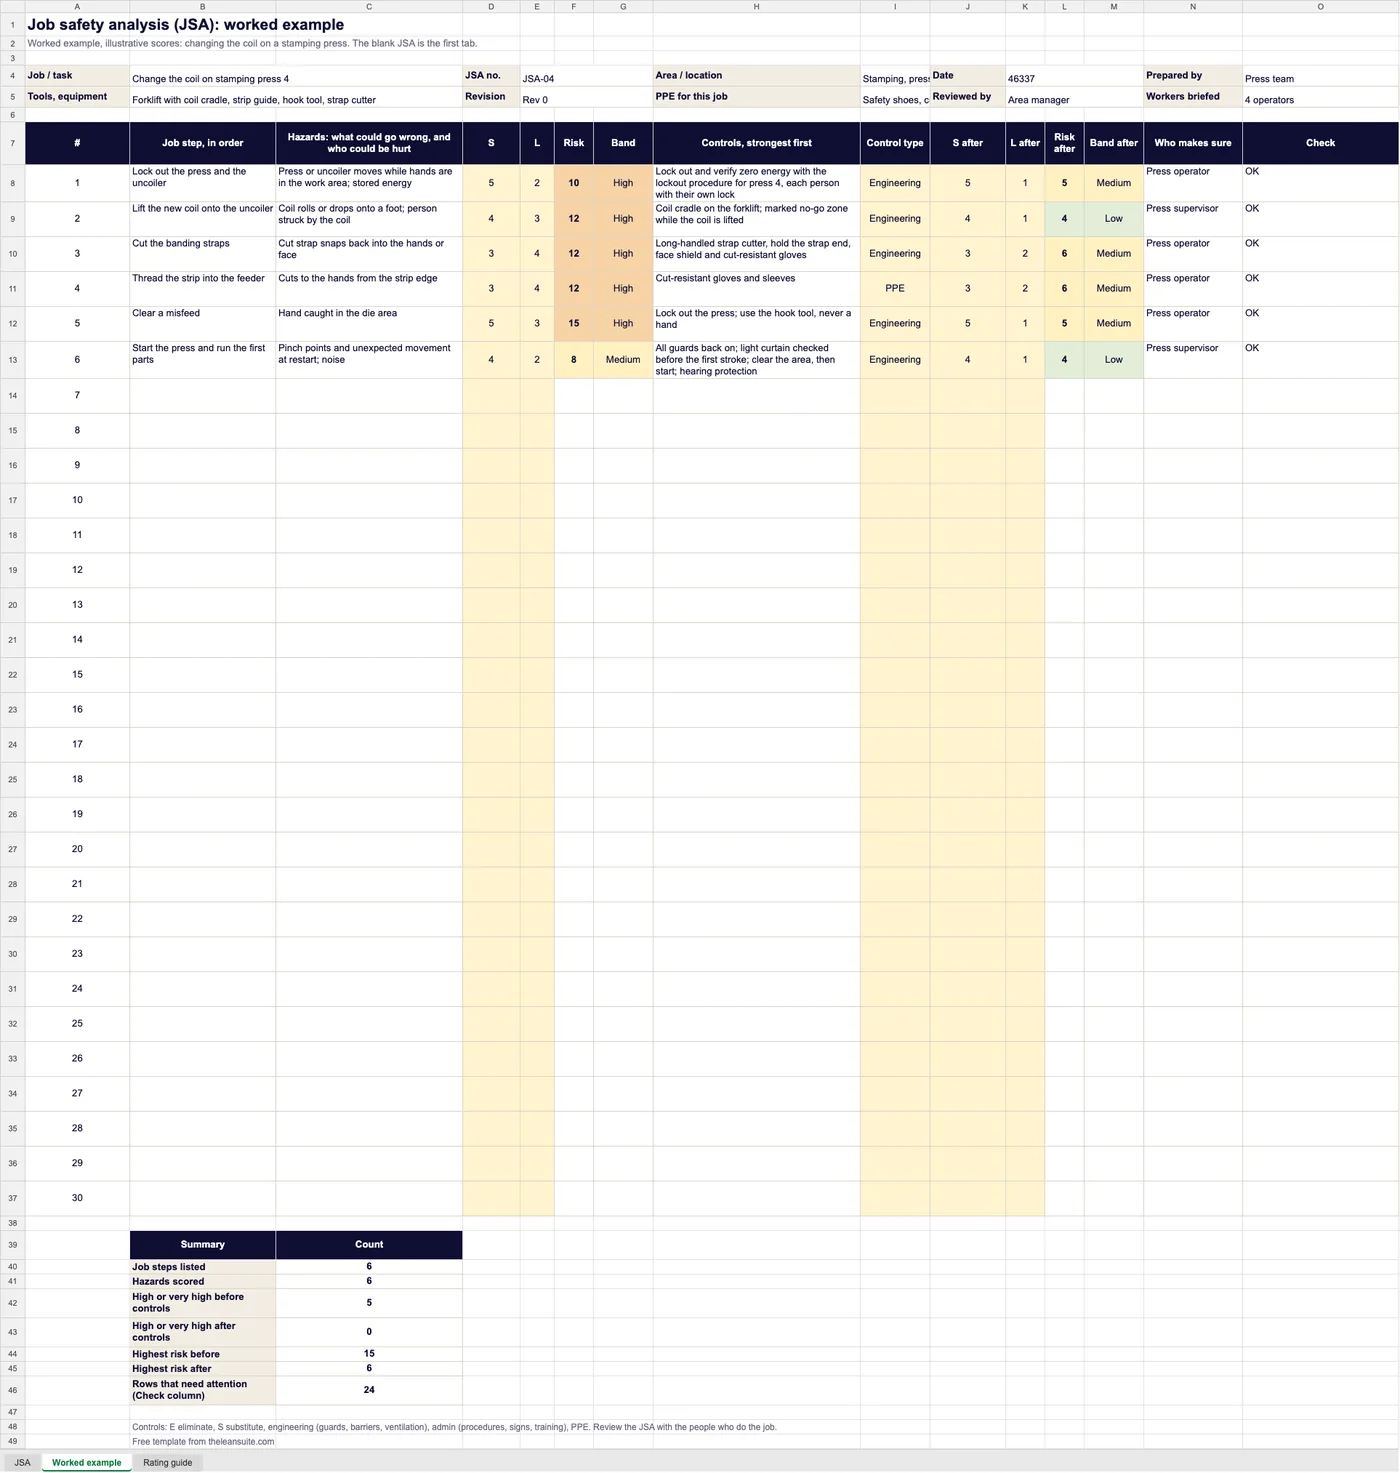 Open full size (opens the picture in a new tab)
Sheet 2: Worked example 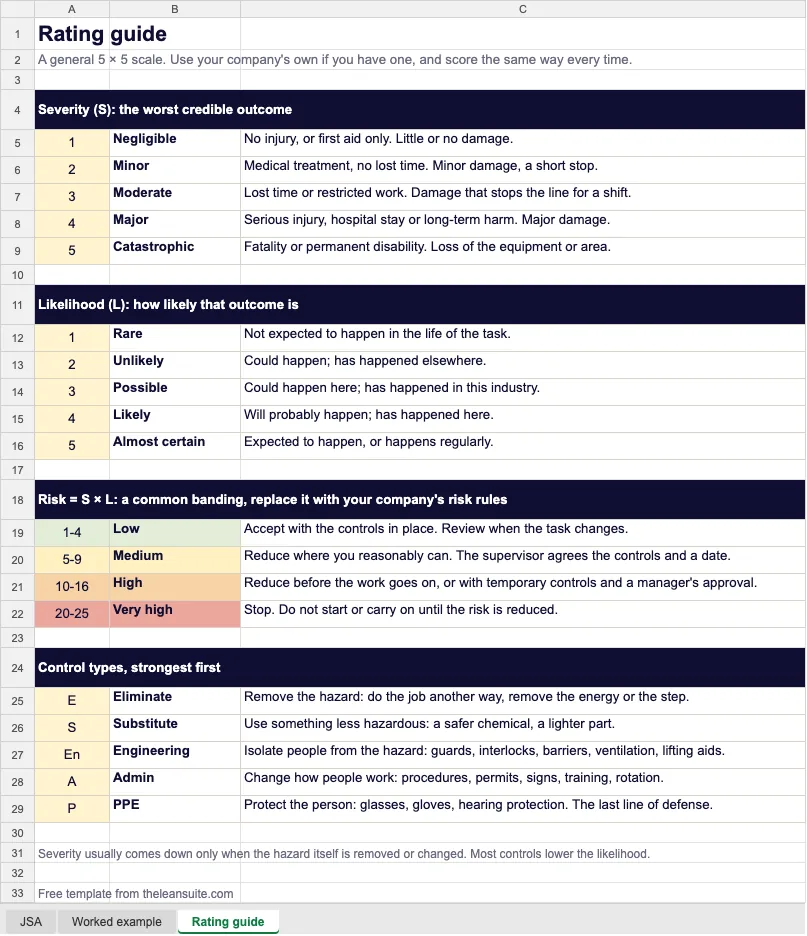 Open full size (opens the picture in a new tab)
Sheet 3: Rating guide
The example in full
The coil-change JSA, step by step
Every row of the worked example: the hazard at each step, the risk scored before the controls, the controls with their type, and the risk scored again.
- Job
- Change the coil on stamping press 4
- JSA no. and area
- JSA-04, Rev 0. Stamping, press 4
- Prepared by, reviewed by
- Press team, Area manager. 4 operators briefed
- Tools and PPE
- Forklift with coil cradle, strip guide, hook tool, strap cutter. Safety shoes, cut-resistant gloves and sleeves, glasses, face shield for strap cutting
| # | Job step | Hazard | Risk before | Controls, strongest first | Control type | Risk after | Who makes sure |
|---|---|---|---|---|---|---|---|
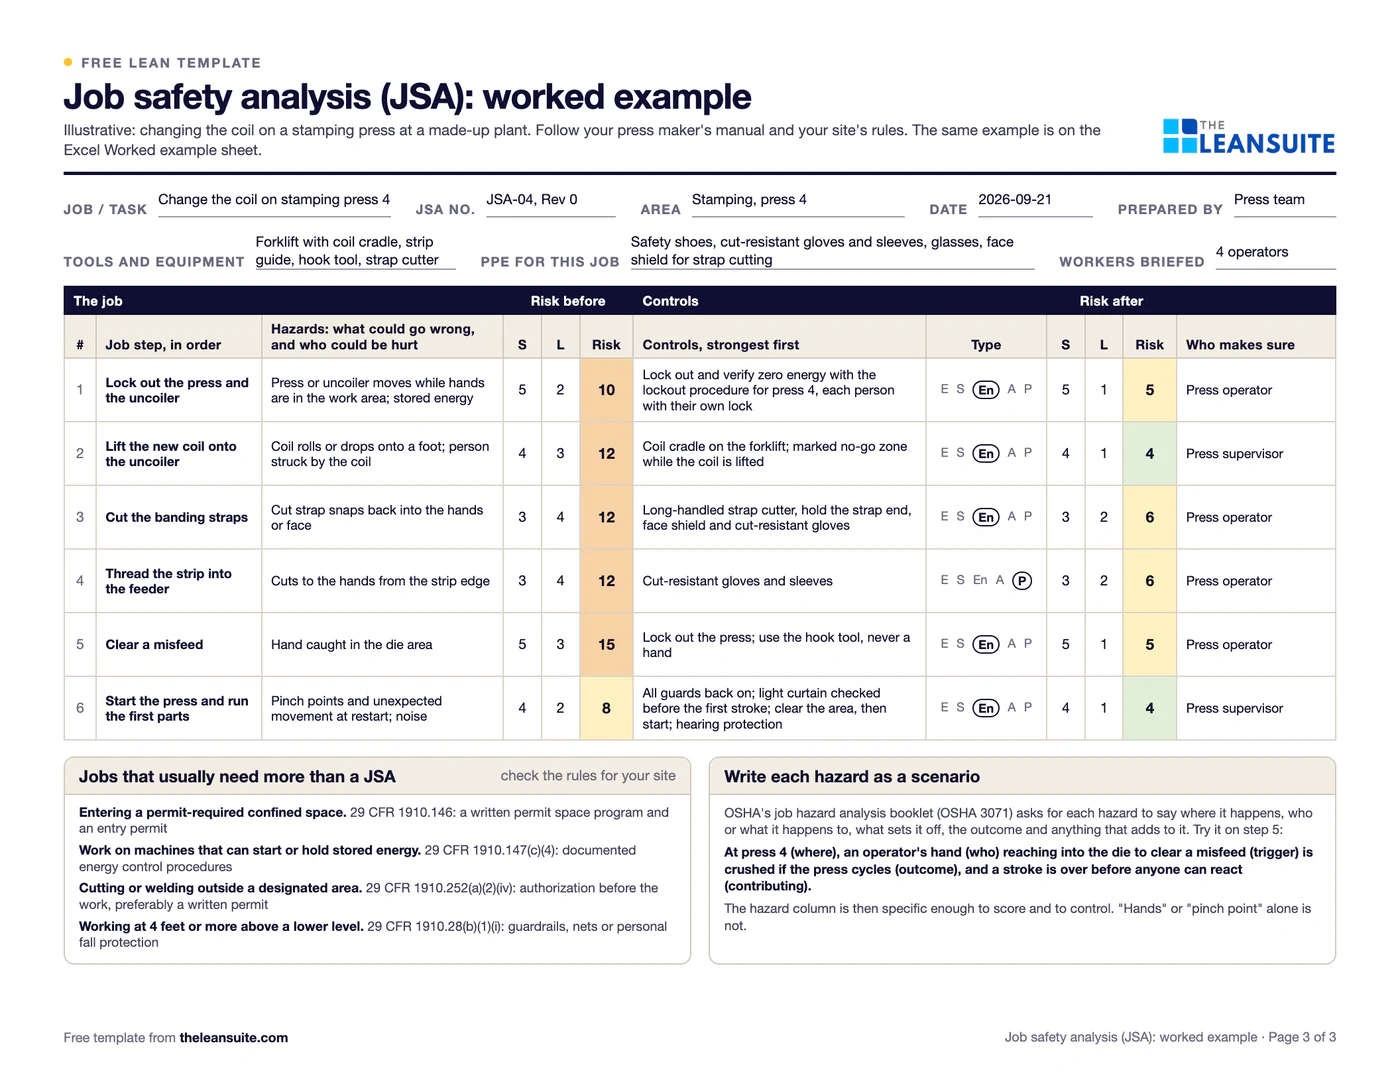
| 1 | Lock out the press and the uncoiler | Press or uncoiler moves while hands are in the work area; stored energy | 10 High5 x 2 | Lock out and verify zero energy with the lockout procedure for press 4, each person with their own lock | Engineering | 5 Medium5 x 1 | Press operator |
| 2 | Lift the new coil onto the uncoiler | Coil rolls or drops onto a foot; person struck by the coil | 12 High4 x 3 | Coil cradle on the forklift; marked no-go zone while the coil is lifted | Engineering | 4 Low4 x 1 | Press supervisor |
| 3 | Cut the banding straps | Cut strap snaps back into the hands or face | 12 High3 x 4 | Long-handled strap cutter, hold the strap end, face shield and cut-resistant gloves | Engineering | 6 Medium3 x 2 | Press operator |
| 4 | Thread the strip into the feeder | Cuts to the hands from the strip edge | 12 High3 x 4 | Cut-resistant gloves and sleeves | PPE | 6 Medium3 x 2 | Press operator |
| 5 | Clear a misfeed | Hand caught in the die area | 15 High5 x 3 | Lock out the press; use the hook tool, never a hand | Engineering | 5 Medium5 x 1 | Press operator |
| 6 | Start the press and run the first parts | Pinch points and unexpected movement at restart; noise | 8 Medium4 x 2 | All guards back on; light curtain checked before the first stroke; clear the area, then start; hearing protection | Engineering | 4 Low4 x 1 | Press supervisor |
Risk is severity times likelihood on a 5 by 5 scale, banded 1 to 4 low, 5 to 9 medium, 10 to 16 high and 20 to 25 very high. These are example bands: use your company's own.
A filled-in example
Illustrative, not a benchmarkAn example: a JSA for changing the coil on a stamping press, six steps, filled in by the press team (illustrative scores). The PDF page 3 and the Excel Worked example sheet hold the same JSA.
The example's risks, before and after controls
- Low (1 to 4)
- Medium (5 to 9)
- High (10 to 16)
- Very high (20 to 25)
- Lock out the press and the uncoiler. Before controls 5 × 2 = 10 (high), after 5 × 1 = 5 (medium).
- Lift the new coil onto the uncoiler. Before controls 4 × 3 = 12 (high), after 4 × 1 = 4 (low).
- Cut the banding straps. Before controls 3 × 4 = 12 (high), after 3 × 2 = 6 (medium).
- Thread the strip into the feeder. Before controls 3 × 4 = 12 (high), after 3 × 2 = 6 (medium).
- Clear a misfeed. Before controls 5 × 3 = 15 (high), after 5 × 1 = 5 (medium).
- Start the press and run the first parts. Before controls 4 × 2 = 8 (medium), after 4 × 1 = 4 (low).
Risk matrix of severity by likelihood, six steps. Before controls five are high: lock out 5 by 2, 10; lift the coil 4 by 3, 12; cut the straps 3 by 4, 12; thread the strip 3 by 4, 12; clear a misfeed 5 by 3, 15; and starting the press is medium, 4 by 2, 8. After controls none is high: lock out 5, lift the coil 4, cut the straps 6, thread the strip 6, clear a misfeed 5, start the press 4.
- Step 1, lock out the press and the uncoiler. Hazard: the press or uncoiler moves while hands are in the work area. Before: severity 5, likelihood 2, risk 10 (high). Control: lock out and verify zero energy, each person with their own lock. After: 5 × 1 = 5 (medium).
- Step 2, lift the new coil onto the uncoiler. Hazard: the coil rolls or drops onto a foot. Before: 4 × 3 = 12 (high). Controls: a coil cradle on the forklift and a marked no-go zone while lifting. After: 4 × 1 = 4 (low).
- Steps 3 and 4, cut the banding straps and thread the strip into the feeder. A cut strap can snap back into the hands or face and the strip edge cuts hands. Both are 3 × 4 = 12 before. A long-handled cutter, a face shield and cut-resistant gloves and sleeves bring both to 3 × 2 = 6 (medium).
- Step 5, clear a misfeed: a hand caught in the die area, 5 × 3 = 15 before. Lock out the press and use the hook tool, never a hand: 5 × 1 = 5. Step 6, start the press and run the first parts: 4 × 2 = 8 before and 4 × 1 = 4 after.
Five of the six steps were high before the controls and none after. Four steps still score medium (5 or 6). The team signed the JSA at the start of the next shift, and the medium risk on threading went on the list for an engineering fix: a strip guide that keeps hands away from the edge.
To score a hazard before and after its controls, the free Risk matrix calculator gives the score and the band on a 3x3, 4x4 or 5x5 grid.
Common mistakes
Writing it at a desk
A JSA written without watching the job misses the real hazards. Go to the job with the people who do it.
Steps too broad
"Run the machine" hides the hazards. Break it down until each step is one action.
PPE as the first answer
PPE is the last line of defense. Look for a way to remove or guard the hazard first.
Filed and forgotten
Review the JSA when the job, the equipment or the people change, and after any incident on that job.
Never shown to the crew
A JSA only helps if the people doing the job have been through it. Brief them and have them sign.
Download the template
Free to use: print it, copy it and edit it for your team. Enter your name and work email once to download.
Run this template in LeanSuite
In LeanSuite safety procedures start from marketplace templates, including risk assessments; anyone reports a hazard as a tag from a QR code, and a serious hazard can become a CAPA project with root cause analysis.
See it in a 45-minute demoIn the lean glossary
Guides
- Stop-work authority: when anyone can halt the job
- Top Five Common Manufacturing Hazards
- Five Ways to Improve Safety on the Shop Floor
- 7 Preventable Shop Floor Incidents Most Plants Miss
- Top Ergonomic Practices for Manufacturing Teams
- REBA worksheet (Rapid Entire Body Assessment)
- ISO 45001 internal audit checklist
- Job hazard analysis guide: how to run one, with a worked example
- Toolbox talk topics for briefing the crew on what you found
Put it on the wall
- Free pPE by zone poster
- Free lockout tagout (LOTO) steps poster
- Free 5 shop floor safety rules poster
- Free stop, think, act safety poster
- Free hierarchy of controls poster
- Free risk assessment matrix poster (5 x 5)
- Free job safety analysis (JSA) steps poster
- Free hazard prediction (KYT) 4 rounds poster
- Free permit to work poster
- Free working at height and ladder safety poster
- Free line of fire poster
- Free hand safety poster
- Free safe lifting (manual handling) poster
- Free workstation ergonomics poster
FAQ
Job safety analysis (JSA) template: common questions
Nothing that matters in practice. Job safety analysis, job hazard analysis and job safety risk assessment are names for the same method: break a job into steps, find the hazards at each step and set controls. Some companies use JSA for the form and JHA for the process, but the content is the same.
The people who do the job, with their supervisor and someone from safety: they know the shortcuts and the awkward steps that a desk review misses. Do one before a new job, a new machine or a changed process, for non-routine work such as maintenance, for jobs with a history of injuries, and again after any incident on the job.
An order for choosing controls, from the strongest to the weakest: eliminate the hazard, substitute something less hazardous, engineering controls such as guards, administrative controls such as procedures and training, and PPE. Try the top of the list first.
Severity times likelihood, each scored from 1 to 5, gives a score from 1 to 25. This template bands it as low (1 to 4), medium (5 to 9), high (10 to 16) and very high (20 to 25). Use your company's own scale and bands if it has them.
There is no single US rule that every job needs a JSA. OSHA publishes a guide to the method (Job Hazard Analysis, OSHA 3071), and some standards require a hazard assessment or a written procedure for specific work, such as the workplace hazard assessment for PPE in 29 CFR 1910.132(d) and lockout procedures in 1910.147. Many companies and customers require a JSA anyway. Check the rules for your site, state or country.
More free templates
All templates- OSHA 300 log workbookA log laid out like OSHA Form 300, a 300A that totals itself, TRIR and DART rates, and an is-it-recordable walk traced to 29 CFR 1904.
- Near miss report formA two-page near miss report from the first report to closure, and an Excel log with status and days open.
- Safety observation card templateFour behavior-based safety cards per sheet, with safe and at-risk checks, the conversation and a tally sheet.
- Risk assessment matrix template (5×5)A color-coded 5 × 5 severity and likelihood matrix, a scoring guide and a risk register.
- Incident investigation report templateFacts and a sourced timeline, causes at three levels, actions by the hierarchy of controls, a US recordkeeping screen and a closure check.
- Incident report templateThe first report, filled in the same shift: what happened, people, injury or damage, treatment, a US recordkeeping screen, actions and an Excel incident log.
- Toolbox talk templateA record of a short safety talk: topic, key points, questions raised, actions and an attendee sign-in sheet.
- Lockout/tagout (LOTO) procedure templateA machine-specific LOTO procedure: energy sources and isolation points, the steps from shutdown to restart, and the annual review.
- Forklift inspection checklist23 pre-shift checks for a week on one page, a do-not-operate rule, and a defect and repair log.
- Warehouse safety inspection checklistThirty warehouse safety checks from aisles to fire exits, marked OK or Not OK, with an action for every finding.
- Pallet racking inspection checklistRack checks per aisle with a green, amber and red damage rating, and a damage log with repair dates.
- Safety audit checklistThirty-four plant-wide safety checks answered Yes, No or N/A, scored by area, with a risk rating and an action for every No.
- Ergonomic risk assessment checklistScreen a task for 21 ergonomic risk factors, score how long each lasts, and rank tasks so the worst get controls first.
- Safety cross calendarA month drawn as the green cross, colored each day by the most serious safety event, with totals and days since the last injury.
- Safety pillar 90-day model area planThirteen weeks from the incident pyramid to safety standards on one model area, a KPI board, the day-90 gate and expansion waves.
- Training matrix template with expiry datesPeople by required trainings with expiry dates, OK, due, expired and missing flags, compliance by person and area, cover per training and a renewal list.
- HACCP plan template: hazard analysis and CCP worksheetThe Codex 12 steps in one workbook: team and product, process steps checked on site, hazard analysis with the CCP decision tree, the CCP table with completeness checks, an allergen matrix and a verification schedule.
- Forklift operator training and evaluation recordPer-operator training and evaluation record, a register with three-year due dates and refresher triggers, and a weighted practical evaluation scoresheet.
- REBA worksheet (Rapid Entire Body Assessment)Score up to six postures with REBA: body-part drop-downs, Tables A, B and C as lookups, final score and action level, and a before and after comparison.
- ISO 45001 internal audit checklist44 audit questions for the plant floor in 16 safety topics, each with its ISO 45001:2018 clause, the evidence to look for and the sample to take, plus 12 worker interview prompts, a findings log and a summary by clause.
- Overhead crane inspection checklist: frequent and periodic34 crane checks tied to OSHA 1910.179: an operator's pre-shift card, frequent and periodic inspections with signed records, a deficiency and tag-out log, and a register of next due dates.
- OSHA compliance calendar (general industry)37 recurring federal OSHA duties with the paragraph, interval, owner, next due date and an overdue flag, plus a 12-month view and counts by owner.
- TRIR and DART rate trackerMonthly hours, OSHA 300 case counts and near misses in; rolling 12-month TRIR and DART rate, a case budget against your target and a trend chart out.
- Machine guarding inspection sheetA machine register with due dates and a status per machine, 21 checks tied to OSHA 1910.212, .219 and .147, a guard opening check against Table O-10, and an action log.
- Fire extinguisher inspection checklist and logThe 8 monthly checks for each portable extinguisher, plus a log with the hydro test interval from OSHA Table L-1, annual and 6-year due dates and open issues.
- Toolbox talk topics (52 weekly topics)52 weekly toolbox talk topics, each with a one-line key message and a discussion question, and a tracker for the year.
- Emergency action plan templateA written emergency plan for a plant: site facts, roles and backups, warden coverage, scenario steps and a drill record.
- Preliminary hazard analysis (PHA) worksheetFind and score the hazards of a new line, machine or process before design is fixed, then choose controls and re-score.
- Risk register templateOne scored list of operational risks with owners, actions and dates, a heat map and a review log.
- Hot work permit templateA hot work permit with a precautions checklist, fire watch record and close-out, plus an Excel permit log.
- Confined space entry permit templateA confined space entry permit with checks, an air test log, an entry log and cancellation, plus an Excel register.
- Management safety tour formA leader's scheduled safety walk: observation form, operator interview, tally, actions, rota and a tour log with a dashboard.
- Hazard prediction worksheetA pre-task worksheet: score what could go wrong at each step of a job, add a countermeasure and score again.
- Chemical inventory and SDS register templateA register of every chemical on site with its hazard class, safety data sheet and label, and a check that incompatible products are kept apart.
- Safety committee meeting minutes templateMinutes for a safety committee: attendance, nine agenda items, an action log that carries open actions forward, and monthly numbers.
- Vehicle inspection checklist53 checks for a truck, tractor or trailer, each tied to the federal rule it comes from, with a defect log.
- Pre-trip inspection checklistA driver's 42-check walk-round in order, with the driver vehicle inspection report for the end of the day.
- Management of change formA change request and review form for a plant: what changes, the hazard review, approvals, pre-startup review, training and close-out.
- Silica exposure control plan templateA written silica plan for general industry: tasks, controls and housekeeping, plus monitoring, medical surveillance, training and a 31-check plan audit.
- Sign-in sheet templateA training and meeting sign-in sheet, a visitor sign-in and out sheet, and an Excel register of attendance and visitors on site.
- Fire drill report templateA report for each fire or mock drill: a timeline from the alarm, the head count, an observer checklist, actions and a yearly log.
- 5S audit checklist template25 checks, five per S, scored 1 to 5, with a score summary and a chart of the five S's.
- 1-1-90 method worksheetOne page: score areas 1 to 5, write the pain point with a before and target number, check days 30, 60 and 90, and plan the next three areas.
- Gemba walk checklistA walk plan and route, 30 prompts in six groups and a findings table with owners and due dates.
- Gemba walk field guideA 20-page pocket guide: the rules, 48 questions by area with good and warning answers, a 30-day route and the follow-through loop, plus an action-log workbook.
- Leader standard work templateA team leader's daily, weekly and monthly routine with a box per day, follow-ups and a weekly review.
- Supervisor leader standard work templateA supervisor's daily, weekly and monthly routine with a box per day, an escalation log and a weekly review.
- Production manager leader standard work templateA production or value stream manager's routine by day, week and month, with an escalation log and a weekly review.
- Plant manager leader standard work templateA plant manager's short routine by day, week and month, with an escalation log and a weekly review.
- Autonomous maintenance (CILR) checklist20 clean, inspect, lubricate and retighten checks with a box per day, an abnormality log and sign-off.
- A3 problem solving templateThe standard seven-box A3 from background to follow-up, with a filled-in worked example. PDF and Excel.
- PDCA templateOne improvement cycle on one page: plan, do, check against the goal, then standardize or adjust. PDF and Excel.
- 5 Whys templateA problem statement, a why chain that can branch, evidence for every answer, root causes and countermeasures that are checked.
- 5W1H templateWho, what, when, where, why and how: a problem statement built from checked facts, and an action plan with nothing left open.
- 8D report templateD0 to D8 with targets, containment counts, occurrence, escape and systemic causes, verified actions and a worked example.
- Poka-yoke worksheetEach step's errors and what they cost, the device (approach, function, method), payback, and a log that proves each device works.
- Skills matrix templatePeople by tasks on a 0 to 4 scale, coverage and gaps per task and shift, and a training plan that closes them.
- Standard work sheet templateTakt time, each element's manual, machine and walk time on a time chart, key points and standard WIP.
- One point lesson (OPL) templateOne topic on one page: wrong way and right way pictures, checkable key points, the standard it belongs to and a sign-off record.
- SMED changeover worksheetChangeover steps with times, internal or external, what can move, ideas and before/after totals.
- Kaizen event charter templateProblem, goal, scope in and out, boundaries, metrics from baseline to target, team and roles, and sign-off before day one.
- RACI matrix template17 kaizen project tasks by 10 roles, with R, A, C, I drop-downs and a check for one accountable per task.
- Layered process audit (LPA) checklist20 yes, no or N/A checks at the station, a layer and frequency matrix, question banks for four processes and a findings table.
- IATF 16949 internal audit checklist40 audit questions in three parts, one for each internal audit IATF 16949 names (system, manufacturing process, product), each with its clause, the evidence to look for, a core tool tag and a column for the customer's own requirement.
- Process audit checklistAudit one process from inputs to results: 32 questions graded conforms, minor or major, a product check, a score by group and a findings list.
- PFMEA template (process FMEA)Failure modes, effects and causes rated for severity, occurrence and detection, with RPN before and after action.
- 5S red tag log and red tagsA log of every red-tagged item with its decision, and six printable red tags to cut out.
- Shift handover templateSafety, production against plan, holds, downtime events, materials and people, and the open actions the next shift takes over.
- Shift schedule packTen shift patterns defined exactly, each with a 28-day calendar, hours worked out from the cycle and a US 40-hour check, plus an Excel roster.
- Kanban card templateSix production and six withdrawal kanban cards to print and cut out, with loop sizing and a card register.
- Pareto chart templateA tally sheet, the Pareto by count and by cost with the cumulative line and the 80 percent threshold, and a before and after comparison. Excel sorts and draws it.
- Control plan templateWhat is checked at each step, against which limits, how, how often, and what to do when a result is out.
- Corrective action request (CAPA) formOne problem from containment to proof the fix worked, with occurrence and escape causes and a closure check that tells you when it can close.
- Idea suggestion formA one-page idea form with the supervisor's answer and points, and an idea log that tracks days to answer.
- Just Do It (JDI) card templateSix Just Do It cards per sheet for quick fixes, with the rules for what counts and a log of every card.
- Quick kaizen templateOne page for a small improvement: before and after, the cause, the countermeasure, the results and whether the standard changed.
- Time study sheetTime each element over 10 cycles and work out the average, lowest repeatable and standard time. Excel does the sums.
- Spaghetti diagram templateSquared paper to trace every trip, a trip log that turns grid squares into feet, meters and walking time, and a before and after comparison.
- OEE tracking sheetOne row per shift for a week. The Excel version works out availability, performance, quality and OEE and charts the week.
- ISO 9001 management review kitA 90-minute agenda, data sheet, minutes and action log for the clause 9.3 review, with an Excel planner that flags the next review due.
- Non-conformance report (NCR) formA two-page NCR from the requirement against what was found to disposition and closure, and an Excel NCR log.
- CAPA log templateAn Excel CAPA tracker with status, days open, late flags and counts by source, plus a printable log and monthly review.
- Supplier corrective action request (SCAR) formA SCAR from the problem and containment asked for to the supplier's 8D-style response, verification and closure, with a filled-in example.
- First article inspection report template (AS9102 forms)The three forms in the AS9102 layout (part number, product and characteristic accountability), 22 review checks, the full and partial FAI triggers, and a worked example with one failed characteristic.
- FOD walk checklist (foreign object debris)26 checks for a FOD walk on the production floor in six groups, a FOD found log, an area plan with the route and frequency, and a worked six-week trend of finds per walk.
- Welder continuity log templateA continuity log for welder qualifications with the next lapse date worked out for each process, 20 checks on the records and the log, and a worked example with three welders and one lapse.
- Weld inspection checklist (visual welding inspection)30 checks before, during and after welding, a guide to the discontinuities visual inspection looks for, a weld map report and a worked example on a 12-weld frame.
- AS9100 internal audit checklist42 audit questions on AS9100D clauses 4 to 10 with the aerospace additions, the evidence to look for and a sample for each area, five grades, a finding and corrective action report, and a worked audit carried through to closure.
- Preventive maintenance checklist templateA PM checklist per machine with readings and sign-off, and a PM schedule that works out the next due date.
- Equipment downtime log (MTTR and MTBF)A breakdown and downtime log, with MTTR, MTBF and downtime by machine and cause worked out in Excel.
- Environmental aspects and impacts registerAn ISO 14001-style register of aspects and impacts, with significance scoring, legal requirements, controls and owners.
- Manufacturing process instruction (MPI) templateOperation steps with parameters, tools, quality checks, safety and a photo each, plus revision history and approval.
- Engineering process instruction (EPI) templateScope, parameters and limits, equipment and materials, validation steps, acceptance criteria, change history and approvals.
- Training sign-off sheetAn attendance and sign-off record where each person signs they understood, with a competence check and an Excel log.
- Learning curve and ramp-up workbookBoth learning curve models side by side, a fit from your own observed hours, batch hours, the unit that reaches standard and a weekly ramp plan.
- Operator staffing calculatorTakt, work content, the operators a line needs, a check of your station plan and the roster with absence cover, from your own demand and element times.
- On-the-job training (OJT) checklistThe training record for one trainee on one job: the four TWI steps signed, every try judged, qualified when your rule is met, then tapering follow-up checks.
- New hire onboarding checklist (manufacturing)29 onboarding items from before day 1 to the 90-day review, with owners, dates and review notes.
- Competency assessment formThe one-person assessment behind a skills matrix rating: each task rated 0 to 4 from evidence, checked, with a training plan for every gap.
- Cross-training plan templateWho is learning which task, from and to which level, by when, and how many are qualified on each task.
- Absenteeism tracker templateA monthly attendance grid with codes, absence rate by person and team, and an optional Bradford factor.
- Engineering change request (ECR) formAn ECR form with the change, what it touches, risk and approvals, and an Excel log that tracks each change to done.
- Design FMEA (DFMEA) templateA design FMEA worksheet with S, O, D and RPN before and after action, a class column and a design rating guide.
- Process flow diagram templateA squared sheet to draw the flow with a symbol key, and a step table that counts operations, moves, checks, waits and storage.
- PPAP checklistThe 18 PPAP elements with owner, due date and status, the five submission levels and a readiness count.
- Process capability (Cpk) study sheet25 subgroups of readings with Cp, Cpk, Pp and Ppk worked out, control limits to check stability, and a histogram.
- Office 5S audit checklist25 checks written for offices and shared areas, five per S, scored 1 to 5, with a score summary and actions.
- Floor marking color guideA floor marking color standard with swatches, marks and line widths to fill in, and a floor marking check with a layout sketch.
- Shadow board plannerTool inventory with fetch time, a layout planned from each tool's outline size, a month of daily checks with 5S audit evidence, and a missing tool log.
- Lubrication schedule templateEvery lube point with lubricant, method, amount, frequency and who, with next due dates and a monthly sign-off record.
- TPM tag logEvery abnormality tag with type, who fixes it, priority and dates, with days open and counts by type and week.
- Autonomous maintenance step auditCriteria for each of the seven autonomous maintenance steps, scored 0 to 2, with the step result and the decision to move on.
- Inventory cycle count sheetA blind count sheet with variance and tolerance, an ABC count schedule and record accuracy, worked out in Excel.
- Hour-by-hour production boardHourly plan against actual with running totals and the reason for each miss, plus a shift summary by reason.
- Cost savings trackerA savings log with hard and soft savings, payback and Finance's sign-off, plus a glide path against the year's target.
- CapEx request formA capital request with options, costs, benefits, payback and NPV, and the approval levels the amount needs.
- Standard cost variance workbookEight standard cost variances from your standards and actuals, favorable or unfavorable, proved against actual cost, with the questions to ask on the floor.
- Cost-benefit analysis templateUp to three options side by side with costs, hard and soft benefits, payback, NPV and the benefit-cost ratio.
- Cost of poor quality (COPQ) worksheetCost of quality by prevention, appraisal, internal and external failure, with COPQ as a share of sales.
- Incoming inspection checklistReceiving inspection checks from paperwork to sample, the sampling plan, the decision, and an Excel log by supplier.
- Supplier audit checklistA supplier process audit of 32 questions scored 0 to 3, with section scores, a rating and the findings.
- Supplier scorecardMonthly PPM, on-time delivery and SCAR measures turned into points, a weighted score and a rating per supplier.
- Receiving logA dock receiving log with quantities, damage, QC holds and putaway, plus a discrepancy report and dock-to-stock time.
- Pre-shipment inspection checklistThe last check before shipping: part, quantity, labels, packaging, paperwork and photos, then release.
- Material shortage logEvery part short with its need date, line impact, ETA and escalation, and counts by reason and supplier.
- Work order template for maintenanceA work order template for maintenance: one form per job from request to handback, and a log of response, completion and backlog by priority.
- Six big losses worksheetWhere a machine's planned time goes: the six big losses in minutes, ranked, with A, P, Q and OEE worked out.
- Andon response logEvery andon call with response and fix times, flags against your targets, and counts by type and station.
- Changeover checklist25 checks for every changeover, a record of planned and actual times, and a log of changeover time against target.
- Kanban sizing calculatorHow many kanban cards each loop needs, per part, with the change from today's cards and what the loop holds in days.
- Kaizen event trackerEvery kaizen event on one sheet: status, roles, the metric against target, open actions and the 30, 60 and 90 day checks.
- Standard work audit checklist24 checks of a job against its written standard, ten timed cycles, and each gap sorted by cause before anyone acts.
- Defect check sheetTally defects by type and day, with units inspected, defect rates, a location sheet and the week's Pareto.
- TWI job breakdown sheetThe TWI Job Instruction breakdown of a job into important steps, key points and reasons, with a worked example and the four steps.
- Standard work combination tableOne operator's manual, machine, walk and wait time on a time chart against takt, with machine cycles and a process capacity sheet.
- Lead time worksheetProduction lead time from the inventory waiting at each step, value-added time and process cycle efficiency, plus an order traced from order to delivery.
- Waste walk checklist (TIMWOODS)32 things to look for across the eight wastes, with where and how much, and a findings log with dot votes, owners and dates.
- Maintenance KPI trackerMTBF, MTTR, availability and PM compliance per asset and month, plant figures from the totals, planned maintenance % and backlog in weeks.
- Daily huddle agendaA 15-minute start-of-shift stand-up in six timed blocks, with yesterday's SQCDP results, today's plan, actions and escalations.
- DMAIC project charter templateThe Define-phase charter on one page: problem and goal, metrics, scope, team and phase dates, with savings and a tollgate checklist.
- Water spider route plan (mizusumashi)A water spider's fixed route: stops with arrival times, what is delivered and collected, route time against the cycle, cart load and a trip log.
- Cost deployment matrixWCM cost deployment on paper and in Excel: loss quantities by process, causal and resultant losses, the cost of each loss, a Pareto and the projects that recover them.
- Equipment criticality analysisAssets scored 1 to 5 on six criteria with your own weights, ranked and sorted into classes A, B and C with a safety override and a suggested maintenance strategy.
- Bottleneck analysis worksheetEffective capacity per station from cycle time, parallel units, availability and yield, the bottleneck, takt and utilization, a queue cross-check and the five focusing steps.
- QA matrix templateDefect modes against stations in flow order: where each is made and first caught, a weight × occurrence × detection score, an AA to C class and the escapes flagged.
- Fault tree analysis templateA drawing area with the FTA symbols, an event table with probabilities and minimal cut sets, and the gates worked out bottom-up in Excel.
- Is / is not analysis templateWhat, where, when and extent with is, is not, distinctions and changes, then each possible cause tested against every pair and ranked.
- 5G investigation sheetConfirm the facts before naming a cause: 5W1H, the five G's with 20 prompts, the gap against the principle and the standard, and the countermeasures.
- Yokoten tracker (horizontal deployment)Copy a proven improvement line by line: the source result, each candidate's own before and after, its share of the source's improvement and the standard updated.
- Coaching kata template (improvement kata storyboard)The learner's storyboard (target condition, current condition, obstacles, PDCA cycles) and a fold-over card with the coach's five questions.
- SMART goals templateWrite a goal, test it against the five SMART letters, then track progress toward the target against the time used.
- Lean readiness assessment templateTwenty statements in four factors, scored 1 to 5 by several people on their own, with averages, the spread between them and the actions.
- Nemawashi template (stakeholder plan)Plan the one-to-one conversations before a decision: who to talk to in what order, their concerns, what changed and where they stand.
- Breakdown analysis reportOne equipment breakdown from the stop to the 90-day check, plus a breakdown log with repeat flags, MTBF and MTTR by asset and a Pareto of causes.
- Heijunka box planner (production leveling)Weekly demand turned into containers a day, takt, pitch and slots, a leveled sequence of products and the heijunka box, with a check that the changeovers fit.
- 4M change management sheet (change point)A shift log of every change to Man, Machine, Material, Method or Design, the extra checks after it and when normal checks resume, with a change point board.
- Future state value stream map worksheetThe eight future-state questions worked through in order: takt, pitch, flow, supermarkets, the pacemaker and the mix, with an EPEI check and current against future lead time.
- Value stream plan (VSM action plan)The future-state map cut into loops, each with an objective and a measurable goal, and its kaizen bursts turned into owned, dated projects on a 12-month timeline.
- Kaizen project plan (Gantt chart)One improvement project as a Gantt chart: tasks by phase with owners, predecessors and working days, a 16-week grid, milestones and a status from planned against actual % done.
- Histogram templateReadings, bins set by the square root rule, a tally and counts, the spec limits drawn and the share out of spec, with the common shapes explained.
- Scatter diagram templateUp to 50 pairs with a group code, r and R², the least squares line, the quadrant count and r for each group.
- Gauge calibration logA gauge register with next due dates and status, a calibration record with as-found and as-left readings, and the steps when a gauge fails.
- Escalation matrix templateWho is called for each type of issue and after how long, with severity rules, contacts and an escalation log.
- Visual management audit checklist29 checks of whether anyone can tell normal from abnormal at a glance, scored by group, with a trend and actions.
- Quality alert formA quality alert to post at the line, a sign-off sheet for every shift, and a log of open, expired and closed alerts.
- TQM self-assessment templateThe eight TQM principles in 24 statements you can check on the floor, scored 0 to 4 by several people, with the spread, the top 3 gaps and an action plan.
- Employee recognition program templateDesign a recognition program on one page, then run it: points per action, prizes, budget, a points ledger, a monthly leaderboard and a fairness check by team and shift.
- Lean transformation roadmapA plant-wide lean program on one sheet: six phases with exit criteria, six workstreams by quarter over 24 months, the model line, metrics with baseline and target, cadence and risks.
- Obeya room plannerPlan the walls, owners, cadence, agenda and rules of an obeya, then run the weekly review of KPIs, problems, actions and milestones.
- Paper forms inventory (paperless manufacturing worksheet)Every paper form, checklist and log in one list: hours a month, who acts on it, how long the paper waits, and which forms to move first.
- Continuous improvement software evaluation scorecardCompare CI software vendors: a must-have gate, eight weighted criteria scored 1 to 5, points out of 100 and a rank, with a demo script and reference questions.
- Lean principles assessment templateThe five lean principles as 25 things you can see on one value stream, answered yes, partly or no on a walk, with a score per principle, the next step and a trend over walks.
- Employee engagement survey templateA short anonymous pulse survey for shop floor staff: 14 statements in six drivers, two open questions, results by driver and team, and the actions.
- Hansei reflection sheet (lessons learned)A written look back at one finished project, event or launch: goals against results in numbers, causes rather than blame, lessons to keep or change, and where else they apply.
- Daily kaizen routine boardA team's 10 to 15 minute daily routine at the board: one problem from each person, small fixes with one owner, counted every week.
- Quality circle meeting recordA circle's charter, a one-page record for each meeting and a problem register that follows every problem from selected to closed or escalated.
- Weekly maintenance schedule templateNext week's maintenance jobs, scheduled only when ready, loaded against each craft's hours by day, with schedule compliance and break-ins at week end.
- Operational excellence assessment templateThe ten principles of operational excellence as 30 behaviors and practices you can see, scored 1 to 5 by several people, with the spread, the three lowest principles and an action plan.
- Scrum meeting agenda templateTimed agendas for the five scrum meetings, a sprint planning sheet, a retrospective sheet, and an Excel sprint backlog with a burndown.
- Toyota Production System (TPS) house templateThe TPS house for one plant or value stream: roof, two pillars and foundation, with what you do today, the evidence, a status and the next step for each element.
- EPEI and batch size calculatorHow often each part can come round on a shared machine (EPEI) and how big each batch must be, from demand, cycle times and changeovers, now and after SMED.
- People, process, technology (PPT) assessmentCheck one change before go-live: 18 people, process and technology statements scored 1 to 4 by the people who will use it, the lowest element and the actions.
- Process capacity sheet templateEach machine in a part's routing with manual, auto and tool change time, its capacity per shift, and the step that limits the cell against demand.
- Jidoka worksheet (stop at abnormality)For one line or cell, every abnormality that should stop the work: how it is detected, how the work stops, who is called, the immediate fix and the root cause step, plus a log of real stops.
- Team charter templateA one-page charter for a standing team: purpose, scope, roles, the KPIs it owns, which decisions it makes itself, norms and cadence.
- Chaku-chaku line plannerPlan a load-load cell: time each machine, load and walk, check that every machine is ready when the operator comes back, compare the cell cycle with takt and size the crew.
- Standard operating procedure (SOP) templateA full SOP in the hierarchical step format, from purpose and scope to the steps, records, revision history and approvals, with review checks and an SOP register.
- Process improvement method selectorEight questions about one problem, an example rule that suggests a method and a matrix of nine methods: when each fits, the usual team and time, and the template to start with.
- X-bar and R control chart template25 subgroups with means and ranges, control limits from A2, D3 and D4, signal flags, both charts and a reaction log.
- Gage R&R study sheet10 parts, 2 or 3 appraisers, 2 or 3 trials: EV, AV, GRR, PV, %GRR and ndc by the average and range method.
- Root cause analysis templateOne report from problem statement to proof: containment, evidence, analysis, verified causes, actions and the effectiveness check.
- Quality control pillar 90-day model area planThirteen weeks from the QA matrix to the QM matrix on one model area, a KPI board, the day-90 gate and expansion waves.
- Autonomous maintenance 90-day model area planAM steps 0 to 3 on one model machine in 13 weeks, a KPI board, the day-90 gate and expansion waves for months 4 to 12.
- Professional maintenance (PM) 90-day model area planThirteen weeks from breakdown analysis to a running PM calendar on one model machine, a KPI board, the day-90 gate and expansion waves.
- Environment and energy pillar 90-day model area planThirteen weeks from waste and energy maps to area standards on one model area, a KPI board, the day-90 gate and expansion waves.
- Focused improvement 90-day model area planThirteen weeks from the loss Pareto to standardized fixes on one model line, a KPI board, the day-90 gate and expansion waves.
- Logistics and customer service pillar 90-day model area planThirteen weeks from the current-state map to pull on one model value stream, a KPI board, the day-90 gate and expansion waves.
- People development pillar 90-day model area planThirteen weeks from the skills matrix to trained cover on critical tasks in one model area, a KPI board, the day-90 gate and expansion waves.
- Early equipment management 90-day model area planThirteen weeks from lessons on current machines to a tracked start-up on one model equipment project, a KPI board, the day-90 gate and expansion waves.
- Cost deployment pillar 90-day model area planThirteen weeks from the loss map to costed, ranked projects in one model area, a KPI board, the day-90 gate and expansion waves.
- Moving from Excel to one system checklistA 34-point checklist and a file inventory for moving trackers from spreadsheets to one system: keep, move, connect or retire, clean, pilot, run both, retire.
- Prioritization matrix templateScore up to 20 improvement ideas on weighted criteria, rank them, test the ranking with equal weights and place each one on an effort and benefit grid.
- Cost per unit worksheet (manufacturing cost per good unit)One product's cost per good unit by materials, labor, machine and overhead, the gap to target, and which cost lever is worth most a year.
- Digital manufacturing readiness assessmentScore 24 statements on process, technology and people from 0 to 4, check the balance between them and rank the gaps by what matters in your plant.
- Manufacturing KPI dashboard templateWeekly plant numbers in, 14 KPIs out: OEE and its parts, first pass yield, scrap, on-time delivery, recordable rate, cost and absence, each against a target.
- RCM worksheet (failure mode and task selection)Failure modes classed as hidden, safety, operational or non-operational, then a task chosen for each: condition-based, discard, failure-finding, redesign or run to failure.
- Error-proofing verification log (daily master-sample check)Each poka-yoke device proved every day or week with a known-bad sample, with missed checks counted and the hours and parts at risk worked out when one fails.
- Downtime reason codes template26 starter codes mapped to the six big losses, a log with drop-downs, a Pareto by code and by loss, and a code card for the line.
- Defect catalogue template with boundary samplesEvery defect with a definition, a class and the reason for it, measured accept and reject limits by zone, boundary samples, a defect log with DPU and Pareto, and an inspector agreement check.
- I-MR chart template (individuals and moving range)Up to 100 single readings with moving ranges, limits from a baseline, five run-rule flags, both charts, a second phase and a reaction log.
- Kaizen event preparation checklistEverything that has to be ready before a kaizen event and done after it: 44 items with owners and due dates from 6 weeks before day 1 to 30 days after, five go or no-go gates and a day-by-day agenda.
- Attribute control chart template (p, np, c and u charts)p, np, c and u charts in one workbook: a chart selector, a sample size check, limits for each subgroup, signal flags and four worked examples.
- Critical spare parts list and stocking levelsAssets ranked by consequence, each part classed and given a stocking policy, and min and max worked out from usage and lead time, with the downtime each stock-out would cost.
- Tier 2 meeting agenda and escalation sheetA 15-minute tier 2 agenda in ten timed blocks, fixed roles and rules, escalation triggers with time limits, and a log that ages every escalation and sends the answer back down.
- Mock recall template: traceability exercise worksheetTrace a finished lot back to every input lot and forward to every first customer, reconcile the quantities against a tolerance and time it against your target.
- ISO 9001 internal audit checklist (production area)46 audit questions for the production floor in 11 processes, each with its ISO 9001:2015 clause, what evidence to look for and the sample to take, plus five defined grades, a findings log, a finding report and a summary by clause.
- Plan for every part (PFEP) templateOne row per part: supplier, pack, container, usage, lead time and locations, with ABC classes, market and line kanban counts and a lineside space check.
- Food plant GMP inspection checklist (21 CFR 117 subpart B)55 checks in the order of 21 CFR 117 subpart B, each citing its paragraph and saying what to look at, with a grade, finding, owner and due date; results by section and grade, a walk route and a bakery example.
- Master sanitation schedule with pre-op verificationA master list of cleaning tasks by area and equipment with frequency, chemical, lockout, who and next due date, a weekly on-time count, and the pre-operational verification log with a release step.
- Changeover matrix templateA from-to matrix of changeover minutes with the clean each transition needs (allergen, colour, format), and a weekly planner that totals the order and suggests a shorter one.
- Measurement uncertainty budget templateA GUM uncertainty budget: Type A and B rows, divisors by distribution, sensitivity coefficients, uc, νeff, k from the t-table, U, TUR and a guard band check.
- Maintenance job plan templateOne job planned on one sheet: steps and craft hours, parts checked against stock, tools, lockout and permits, documents, a ready check for the schedule, and technician feedback.
- Video time study filming checklistA pre-shoot checklist and shot log for filming a time study on video: camera, light, people, settings, power and review.
- Reorder point and safety stock sheet (many parts)Safety stock, reorder point, order quantity and an order list for up to 500 parts, worked out from each part's own demand and lead time history.
- Energy use and EnPI trackerMonthly electricity, gas and fuel in one unit, a 12-month regression baseline, expected against actual energy for each month, an EnPI ratio, the running saving and the tests that say whether the model can be trusted.
- FIFO lane sizing sheetThe maximum for a FIFO lane from the stop it must cover, in whole containers, with length, refill and wait checks for up to eight lanes.
- Pugh matrix templateCompare up to 8 concepts with a datum as better, same or worse on up to 12 criteria, flag must-haves, and carry the strongest into a second round.
- Condition monitoring route sheetA route of measuring points with baselines, alert and alarm limits, a check interval from the P-F interval, readings with rising and overdue flags, and an exceptions list worst first.
- Quad chart templateA project on one page in four boxes: idea and owner, problem, approach, and cost, schedule and result.
- Loss tree worksheetBreak one big loss number into area, line, machine, loss type and cause, and stop at the cause a team can fix.
- Equipment register templateOne row per asset, with hierarchy, criticality, PM strategy and owner, and a check that flags what is missing.
- Machine history record templateOne record per machine: components and their life, every breakdown and repair with cost, MTBF and MTTR, and a repair-or-extend check.
- Compressed air leak survey logWalk sheet, printable leak tags and a tracker that puts an annual cost on every leak and follows it to a verified fix.
- Defect detection matrix templateMap where each defect is created and where it is found, score the gap and move the check closer to the cause.
- Project savings validation checklistThe gate between a project's claim and a reported saving: 20 checks, a claims register and a six-month sustainment check.
- Life cycle cost analysis templateCompare up to three machines over ten years: price, energy, upkeep, failures and down time, discounted to present value.
- Equipment design review checklistGate reviews for a new machine before order, before build and before start-up, with a safety buy-off and a problems journal.
- Energy loss matrix templateSeven types of energy loss by six energy sources with a cost in each cell, an action plan and an idle-period shutdown checklist.
- Environmental compliance audit checklistAn internal environmental audit: 37 questions with what to look for, a findings log with classes and a score by section.
- APQP checklistThe five APQP phases as a checklist: deliverables, owners, due dates, gate reviews and an issues list.
- Out-of-control action plan (OCAP) templateA reaction plan for a control chart: the steps, what each signal means, who to call and a log of events.
- Quality inspection checklistAn in-process and final inspection record: measured characteristics, visual checks, a decision and first pass yield.
- AQL sampling plan templatePick a sample size, read accept and reject numbers, record the defects and decide on the lot.
- MSA study workbookBias, linearity and stability study sheets for a gauge, with the arithmetic done and a guide to which study when.
- Incoming quality control stage sheetA register that shows how much control each purchased part has and plans the move from your dock to the supplier's process.
- Internal audit schedule templateA year of internal audits planned by risk: the programme, the register, the auditors and the findings.
- Approved supplier list templateThe list of suppliers you may buy from, with the evidence behind each, certificate expiry alerts and re-evaluation dates.
- Pest control inspection checklistA pest control walk-round for a food plant, with a log of traps and stations and action levels for each type of device.
- Cleanroom audit checklist33 cleanroom checks split by how often they run (each shift, weekly, per plan, system), a gowning order to watch against, a differential pressure log and a findings log, with a worked week of readings.
- GMP audit checklist for drug manufacturing42 self-inspection checks ordered by the subparts of 21 CFR 211, each with its section, the matching EU GMP chapter and whether it is seen on the floor or in records, graded critical, major or minor, with a worked audit of a packaging line.
- Line clearance checklist28 line clearance checks in six sections (area, equipment, materials, printed materials, documents, coder and vision settings), cleared by the operator and verified by a second person, with a printed-materials reconciliation and a worked example that does not balance.
- ISO 13485 internal audit checklist38 questions on ISO 13485 clauses 4 to 8, each with the FDA QMSR section that brings it in or adds to it, a production floor tab (records, current instructions, training, nonconforming product, CAPA) and a worked audit of a catheter line.
- ISO 22716 GMP audit checklist for cosmetics25 cosmetic GMP checks following the sections of ISO 22716, split into a floor walk (people, premises, equipment, materials, production) and system checks (lab, out of specification, deviations, complaints, change control, audits, documents), with a worked audit of a filling line.
- SSOP template: sanitation standard operating procedureOne sanitation SOP sheet per area or machine (steps, chemical, contact time, PPE, lockout, owner), a 23-check pre-op inspection and a verification log for visual, ATP and micro checks.
- SQF internal audit checklist for food manufacturing54 questions in the two parts of the SQF manufacturing code (system elements and GMP), each group mapped to BRCGS and FSSC 22000, graded Conforms to Critical, with findings, a score and a yearly plan.
- Injection molding defects chart16 molding defects with causes by machine, material, mold and method, first checks, and an Excel defect log with a Pareto.
- ESD audit checklist29 checks for an ESD protected area, with daily tests split from periodic verification, a measurement log and a worked audit.
- OKR template for manufacturingObjectives with three or four key results each, scored 0 to 1.0 from baseline and target every month, cascaded to facility, department and person with an Other bucket for work that serves no objective.
- Goal cascade and alignment templateA one-page cascade tree from company to person with the catchball reply on every card, and an initiatives list that shows how much work serves a goal and how much sits in Other.
- Monthly business review template (operations review agenda)A 90-minute operations review in nine timed blocks: who speaks when, the KPIs each block reviews with red or green, a prep checklist for every presenter and a log of decisions and actions.
- Rolling action item list (RAIL) templateA single running list of actions kept from meeting to meeting, with a weekly review sheet and age counts.
- Goods received note templateA one-page goods received note and an Excel register with accepted to date, still to come and an invoice check for each PO line.
- Lessons learned templateA one-page lessons log, a 45 minute session guide and an Excel register that shows which actions are done, open or overdue.
- Packing list templateA one-page packing list with a pack checklist, and an Excel file that works out volume, shipped to date and back order.
- Meeting minutes templateA one-page minutes form and an Excel log of decisions and actions with owners, due dates and status.
- Purchase order templateA one-page purchase order and an Excel version that adds up the lines, checks the approval limit and tracks what is still to come.
- Action plan templateA one-page action plan and an Excel tracker with percent done, status and a weekly timeline.
- Part submission warrant (PSW) templateA PSW working form plus twelve checks before anyone signs, and an Excel that works out whether the warrant is ready.
- Ballooned drawing and dimensional results templateA ballooning guide and a results sheet for six parts per characteristic, with OK, NEAR LIMIT or NOT OK worked out for each row.
- Attribute agreement analysis templateA 30-part, three-appraiser study sheet for pass or fail decisions, with kappa, effectiveness, miss rate and false alarm rate in Excel.
- DVP&R template (design verification plan and report)A design verification plan and report on one sheet: tests, criteria, owners and dates, with status worked out as of a date.
- Special characteristics matrix templateOne row per special characteristic, followed from drawing to PFMEA, control plan, gauge study and capability, with the first gap named.
- Maintenance request form templateA one-page request form and an Excel log that times each answer against a priority target.
- Maintenance log templateA maintenance log page and an Excel log that totals cost, downtime and planned work and flags repeat breakdowns.
- Preventive maintenance schedule templateA PM schedule with next due dates and status, and an Excel calendar of the jobs and hours in each month.
- Machine setup sheet templateA setup sheet with limits, a first piece check and setup minutes, and an Excel log of setups against a standard.
- Work instruction templateA one-page work instruction with key points and step times, and an Excel training record that flags re-checks.
Can't find the template you need?
Tell us what you're looking for. We'll make it and send it to your inbox, free.
A shift handover sheet, a red tag log, a changeover checklist for one machine: if your team uses it on the floor, ask.